dApp Introduction
Go up to the CCC HW page (md) | view one-page version
Overview
This homework will take you through the process of compiling, deploying, and running a decentralized application (dApp) on our private Ethereum blockchain. This assignment does not focus on the programming aspects of Solidity – that’s in a future assignment, as well as the lectures.
You will have to have completed the connecting to the private Ethereum blockchain (md) assignment. You should have a few (fake) ETH from the faucet. For some of the tasks below you will need to launch your geth node, connecting to the course server, and start up a geth Javascript terminal; how to do all that is all described in the connecting to the private Ethereum blockchain (md) assignment. If you have not successfully completed that assignment then you will not be able to complete this assignment.
Warning to Mac OS X users: there is one part in this assignment that Safari seems to have issues with. This part is indicated when you get to it, and you may have to switch to a different browser (Firefox or Chrome) to complete that part.
Giving credit where credit is due: The particular smart contract being used here was inspired by the one in this github repo by Dapp University (disclaimer: they are not an actual accredited university; but they do have great online tutorials).
In addition to your source code, you will submit an edited version of dappintro.py (src).
Changelog
Any changes to this page will be put here for easy reference. Typo fixes and minor clarifications are not listed here. So far there aren’t any significant changes to report.
Introduction
To deploy and run a smart contract, you need to be able to the standard development tasks – editing, compilation, testing, and deployment. The third one – testing – is tricky, as you have to be running in an environment that simulates a blockchain and (fake) accounts with (fake) ETH. Once it’s compiled, you have to then be able to load it onto the blockchain, whether that blockchain is simulated (for testing) or real (for deployment).
For the development tasks, we are going to use Remix, which is an IDE designed specifically for Solidity smart contracts on an Ethereum blockchain. You can use it online at remix.ethereum.org, or you can download the latest version on your computer via remix’s github repo. Each method has it’s pros and cons.
- Online Remix: The online site, at remix.ethereum.org, is quick to use, doesn’t require installation, but does not save your changes to your local drive. The files that it saves remotely are tied to a cookie in your browser, which will mean you cannot edit those online files from a different browser (but you can copy/paste them in again if you have saved them locally). If you do want to go this route, we suggest editing your code with sublime with the Ethereum package installed. And if you make edits to the file on the Remix web page, you have to cut-and-paste that back into the local file on your computer so that you have an updated local copy. In the past, people have had issues with different browsers. Chrome and Firefox are known to work, but Safari seems to have issues with deployment. For the last assignment in this course you will have to use Chrome.
- Desktop Remix: The other option – installing Remix locally – requires going through the installation process (which is really quick), but makes it much easier to develop locally. In the past there were some bugs that caused issues, but they were solvable. To download the package for your OS, see the Remix download page. If the desktop version starts running really slowly, try restarting the application.
We recommend to use the online version, but the choice is yours. If you do try one version, and it is not working well, you can always switch to the online version. NOTE: if you download the desktop version, make sure you download it from a reputable site. Many cryptocurrency-related downloads are malware in disguise. The directions herein will apply to both options, as the user interface is the same. Remix’s source code is available on github, and it is released under the MIT license; some of the Remix icons are included herein. The desktop version can be downloaded via links from that github.com site – specifically at https://github.com/remix-project-org/remix-desktop/releases.
Remix allows you to develop, compile, and test your code on a fake blockchain it simulates with fake accounts. It cannot, all by itself, deploy to a blockchain. For that, we are going to use geth. We will connect Remix to geth for our deployment, and geth will be the conduit to deploy to the blockchain. More on this later in the assignment.
There are many different tool chains that one can use to compile and deploy smart contracts – Truffle and Ganache, Hardhat / Foundry, command-line compilation with solc and deployment with geth, etc. We had to pick one, and Remix seemed the most straight-forward and realistic choice. It also is the choice that works best across all the platforms on the computers for the students in this course. We will see how to interact with the blockchain through the geth Javascript console in an in-class activity in the Solidity lecture slide set.
The same process described herein can be used to deploy on the real Ethereum blockchain. The only difference is that you would run geth to connect to the real Ethereum blockchain, rather than our private course blockchain. And of course you would need real ether to pay for the gas fees. Everything else is exactly the same.
Code
For this assignment we will be providing the Solidity code to use: the interface IPoll.sol (src) and a smart contract that implements that interface: Poll.sol (src). The code will allow voting for something via the blockchain – an election, your favorite color, or anything else. Election dApps are fairly common as first examples of Solidity programs. Note that while you should be able to gain a rough idea of what is going on in the code, the tasks herein are not to necessarily understand the code, but to be able to compile and deploy it. Understanding the code, and writing your own, is in the next assignment and upcoming course lectures.
The IPoll interface, and the implementing Poll contract, allows for only a single election per deployed contract. This is inefficient – a better implementation would be to allow a single contract to host many polls. However, to keep this first example simple, the contract presented only allows one poll per contract.
While we provide the necessary code, you will need to make two small modifications. You are going to start an election on something other than the default (which is one’s favorite color). Pick something interesting to host a poll for. Edit the Poll source code to add your own choices to your Poll contract. In particular, you should ONLY change two things: the addChoice() calls in the constructor (you can add more or remove some, as needed) and the value of the purpose string. It is important that you do not change any other code in the contract, else it will not work properly when we are testing and grading it! Please choose something that is not controversial – there are many great ways to fight for, and to voice opinions for, things that you believe in and that others may find controversial. Our private Ethereum blockchain for this course is not one of them.
In addition to your Poll.sol source file, you will have to submit the dappintro.py (src) file. This file will contain the various transaction hashes and account information that you will be generating as you work through this assignment.
Hints
There are a few very important hints that will make your life SO MUCH easier if you follow them throughout the semester.
Directories: Keep all your Solidity code, for all your assignments in this course, in the same directory. Much of the code will be re-used between assignments. There will never be two different files that have the same name but different content. Some of the later assignments will have a dozen or so files that are included (imported). And many assignments will use the same set of imported files. And many assignments will import the same (large) set of files. Having everything in the same directory will make it much easier to manage.
Desktop Remix: Desktop Remix likes to scan your directory structure so that it knows where the .sol files are. But this can take a looooooong time if the file explorer pane is opened up to your root directory. Instead, do a File -> Open Directory, and open up the directory created just above. This will make Remix much faster in all aspects. You will see how to do this in the next few steps, but we wanted to include this hint here as well.
Desktop Remix, again: Sometimes the desktop version of Remix has issues. If issues happen, try to solve it, but be willing to switch to the web browser version if this occurs. So far we have found solutions to all the issues that have come up, and a few tips for how to work well with Remix will be discussed in lecture.
Desktop Remix, yet again: As the Remix installation is not signed, the relevant operating systems (notably Windows and Mac OS X) will not want to run it after it is installed. In Mac, you can change this in the Privacy & Security settings. Windows should allow you to run it after clicking through a number of dialogs. If this all makes you uncomfortable, you are always welcome to use the online version.
Web Remix: The web version of Remix also has issues – in particular, it saves your code on remote servers, and is tied to a cookie in your web browser. If you lose the computer, reset your cookies, or are using a different machine, then you will not be able to access your files. This means you will have to cut-and-paste the code to a locally saved file to ensure you can access it elsewhere.
Geth node: You will have to start a local geth node to deploy your contracts. You did this in the private Ethereum Blockchain (md) assignment. There are extra options that we will be using, but those options are already in the geth-config.toml file that you configured in the last assignment (md).
Remix TXNs pending: If your transactions (and contract deployments) seem to stay stuck in ‘pending’, check if your time is synced with time.gov, as clock skew will cause geth synchronization issues.
Part 1: Remix
Remix is an IDE for developing Ethereum smart contracts in Solidity. Remix provides an easy way to read compiler error messages and makes it really easy to test your smart contract as you are developing it. You can either use the online editor at remix.ethereum.org or you can install it locally via the Remix download page. The web interface on remix.ethereum.org is designed to look just like the IDE, and you are welcome to use either – the directions herein apply the same to both, as they have the same user interface. However, if you do use the web interface, make sure you save your text file back to your computer.
- Load up Remix. The far left column has a number of icons at the top – the Remix logo (
 ), a file explorer icon (
 ), a search icon (
 ), a compilation icon (
 ), and a deploy & run icon (
 ). At various times in this tutorial, you may see a debugging icon (
 ) beneath these, but we are not going to focus on the debugger in this assignment. The desktop version may have an additional icon or two, but we can ignore those. On the bottom are two more icons – a plugin manager icon (
 ) and settings icon (
 ).
). - Create a directory for you to put all of your Solidity files in. You will never have two different versions of a file, and it will make your life MUCH easier if it is all in one directory. The have Remix use that directory via File -> Open Folder.
- Click on the file explorer icon (), click on the contracts folder (if it exists; if not, pick a directory where you want to store the files), and select ‘New File’ – name it ‘Poll.sol’. Copy and paste the Poll.sol (src) program there. Do the same with IPoll.sol (src). You should now have two Solidity files – Poll.sol and IPoll.sol.
- If you are using the desktop version, you can browse the local file system (select ‘localhost’ in the Workspaces drop-down box) to find the directory where you are going to keep IPoll.sol and Poll.sol
- HINT: In the desktop version, do a File -> Open Directory. Choose your directory for the assignments for this class. This will save a lot of time, as Remix will not have to look for Solidity files on your entire hard drive, just that directory.
- Ensure you have made the changes mentioned above – you need to select a different purpose for the poll (and update the
purposestring appropriately), and also modify theaddChoice()calls in the constructor (you can add or remove them as needed). You should not make any other changes to the Poll.sol code. - To compile it, click on the compilation icon () in the far-left pane. You may notice a green check mark on the compilation icon – it might automatically compile it as you type (this does not seem to be consistent across all platforms).
- Remix does allow for compiler optimizations, but we are not going to explore them in this assignment. For now, don’t select any optimizations (meaning leave it as the default options); doing so makes it harder to trace the contract when debugging it.
- We are compiling with an earlier version of the Ethereum bytecode. Click on “Advanced Configurations” in the compilation pane. In the EVM version drop-down, select “london”. IF YOU DO NOT DO THIS, NOTHING WILL WORK CORRECTLY
- Click “Compile Poll.sol” (NOT IPoll.sol). It should compile without errors.
- … but you may get an error on the compiler version. The latest Solidity version is 0.8.29, although 0.8.28 is more common. Your installation may have an earlier version. At the top of the compiler pane, it will have a drop-down list of compiler versions – they show up as something like, “0.8.28+commit.7893614a”. Select the latest version. If that version is before 0.8.28, then make the appropriate modification in the source code (line 6 in both files).
- Click on the “deploy & run” icon () in the far-left pane. For the Environment, we will use “Remix VM (London)”, which means that Remix will simulate, in Javascript, a fake Ethereum blockchain and 10 fake accounts for us. You can see the accounts in the ‘Account’ drop-down list. YOU ALSO HAVE TO SELECT LONDON HERE else it will not work correctly.
- Click the orange “Deploy” button. It’s now running on the Ethereum blockchain that it simulates in Javascript, deployed from the selected (and also simulated) account shown in the “Account” drop-down list.
- Errors? Make sure you are trying to deploy Poll.sol, not IPoll.sol. Like all other languages, you cannot deploy an interface directly.
- Test out the deployment
- Look under “Deployed Contracts”, below the “Deploy” button – click on the arrow to the left of “Poll at …”. It will show you various buttons to test out your smart contract.
- Blue buttons are
vieworpurefunctions – they do not require writing a transaction to the blockchain - Orange buttons are functions that require sending a transaction to the blockchain
- Red buttons (not present in the current contract) are functions that you send some ether along with the transaction to the blockchain; we’ll see these later in the semester
- Blue buttons are
- Click on “num_choices”. The console (under the code window; you can make it bigger to see what’s going on) will state, “call to Poll.num_choices”. The line below that will have a “Debug” button and a down arrow – click on that arrow. In the various items that appear, you will see a “decoded output” field that lists the number of choices for this smart contract.
- This output will also appear below the blue “num_choices” button. However, it only appears below the button for
viewandpurefunctions; if it’s a regular transaction, you have to look at the decoded output section described above
- This output will also appear below the blue “num_choices” button. However, it only appears below the button for
- The “choices” button requires a number – put any valid number in there (non-negative and less than the number of choices), and click that button. Again, if you expand the returned result, under “decoded output”, you will see the values in the Choice struct that was returned. Note the number of votes is 0.
- Let’s vote! Pick the same option you picked above, enter that value into the box. Then click on the orange “vote” button.
- Note that this button is orange, meaning this requires sending your vote as a transaction to the (simulated) blockchain
- View the output. You’ll notice that there is nothing in the “decoded output” field (this had no return value – it’s the equivalent of a
voidsubroutine), but there is now a “transaction hash” field. - Pull up the data on that choice (enter the same choice number next to “choices”, and click that blue “choices” button). You will notice that the number of votes is now 1.
- Try to vote again, for any choice. Notice that it doesn’t work – the console states that “The transaction has been reverted to the initial state”, and has a red icon next to it. This particular smart contract prevents double-voting. It does this by keeping track of who has voted (in the
votedmapping on line 32), and then ensuring that the current voter has not already voted (the first line of thevote()method via arequire()call). If arequire()call fails, then the state of everything is reverted back to what it was before the transaction occurs (although you still lose your gas fees). - Switch accounts (choose a different one in the drop-down list under “Account”), and try to vote – this time it will work, since that (new) account number has not already voted.
- Errors:
- Did you get an invalid opcode error? Then you didn’t follow the steps in #5 and #6 (selecting London).
- Look under “Deployed Contracts”, below the “Deploy” button – click on the arrow to the left of “Poll at …”. It will show you various buttons to test out your smart contract.
- Explore compilation again
- Click on the compilation icon (). At the bottom of the left pane click on “Compilation Details”. This is showing all the results of the compilation.
- Expand the ‘bytecode’ button. There is a lot here, and we can ignore most of it. Scroll down to the very bottom of what just appeared – the two fields we care about are the “object” field and the “opcodes” field.
- The bytecode -> opcodes field are the Ethereum bytecode that the smart contract was compiled down to. This is similar in concept to the Bitcoin Script, although it has the ability to perform looks (via
JUMPcommands and similar), and is a lot more complex. - The bytecode -> object field is the raw hex of the compiled program itself – the bytecodes were compiled to their hexadecimal equivalents. This very long string (over 5,000 bytes) is what is actually loaded onto the blockchain. When we deploy our code to the blockchain, below, you will be able to see that bytecode in the transaction via the blockchain explorer.
- The bytecode -> opcodes field are the Ethereum bytecode that the smart contract was compiled down to. This is similar in concept to the Bitcoin Script, although it has the ability to perform looks (via
- Expand the ‘bytecode’ button. There is a lot here, and we can ignore most of it. Scroll down to the very bottom of what just appeared – the two fields we care about are the “object” field and the “opcodes” field.
- Back in the left-hand pane, under the “Compilation Details” button is a link to copy the ABI – click on the copy icon. In any editor, paste that into a blank file. This is the Application Binary Interface – it specifies how to interact with the smart contract. Think of it like a C++ header file – it gives the interface, but not the implementation. One cannot interact with a smart contract without having the ABI. As you scroll through the ABI, you will notice that all the fields and method are listed there, along with all the various types.
- THIS IS IMPORTANT! In future assignments, when you are going to write your own smart contracts, you will need to access the ABI for some of your contracts.
- Click on the compilation icon (
- Explore Remix on your own. You are going to be spending a lot of time developing smart contracts in Remix. Spending a bit of time learning how it works, and becoming comfortable with the interface, will save you a lot of time in the future.
Part 2: Testing
Testing a blockchain application is very counter-intuitive. There are no print statements and no viable debuggers. We can deploy it and then try it out, but that’s not a great way to test.
You should ensure you are familiar with the Testing and Debugging section of the Solidity slide set.
This task will show you how to develop unit tests for your Solidity application. To set this up:
- Click on the plugin manager icon () in the bottom of the far-left column of icons in the Remix window. In the search box enter ‘test’. The Solidity Unit Testing plugin will appear; click the green activate button.
- Remix will now display a unit testing icon (
 ) in the left-most pane; click on that.
 - The plugin will automatically create a sample unit test class for you – to do this, click on “Generate”. You will see a Poll_test.sol file created.
- Remix has a bizarre directory choice for where to put this file – on Linux systems, it goes in
~/tests/. You will need to find where it is on your OS via a file search.
- Remix has a bizarre directory choice for where to put this file – on Linux systems, it goes in
- Click on the blue “Run” button – this will run the unit tests. Some will pass and some will fail, which is expected at this point. Note that, for unit tests, you do not have to re-compile it each time – the Run button will do that, if necessary, for you.
- Let’s make the existing tests pass. In the
checkFailure()function, changeAssert.notEqual()toAssert.equal(), and re-run the tests. They should all pass now. - Add the following method to the Poll_test class:
function checkChioceCreation() public {
      Poll p = new Poll();
      p.addChoice("test1");
      Assert.equal(uint(p.num_choices()),uint(7),"Choice not added");
}- That method checks that there are 7 choices, as 6 were created by the constructor, and one more was added in this method; you will have to adjust this value if you changed the number of choices in your constructor
- If you re-run the unit tests, this test should also pass
- Look at the comments just above the
checkSenderAndValue()function. These comments specify the particular account that is passed in, and how much ether (actually wei) that is passed in as well. You can see a full definition of these types of comments here.
You do not need to submit the Poll_test.sol file. The purpose of this section was to show you how to start writing unit tests. You will need this when you start developing Solidity applications in the next assignment.
The Poll_test.sol file that was auto-generated from the default Poll.sol file is as follows. You do not need to read through this code; it’s only here as a reference.
// SPDX-License-Identifier: GPL-3.0

pragma solidity >=0.4.22 <0.9.0;

// This import is automatically injected by Remix
import "remix_tests.sol";

// This import is required to use custom transaction context
// Although it may fail compilation in 'Solidity Compiler' plugin
// But it will work fine in 'Solidity Unit Testing' plugin
import "remix_accounts.sol";
import "../Dropbox/git/ccc/hws/dappintro/Poll.sol";

// File name has to end with '_test.sol', this file can contain more than one testSuite contracts
contract testSuite {

    /// 'beforeAll' runs before all other tests
    /// More special functions are: 'beforeEach', 'beforeAll', 'afterEach' & 'afterAll'
    function beforeAll() public {
        // <instantiate contract>
        Assert.equal(uint(1), uint(1), "1 should be equal to 1");
    }

    function checkSuccess() public {
        // Use 'Assert' methods: https://remix-ide.readthedocs.io/en/latest/assert_library.html
        Assert.ok(2 == 2, 'should be true');
        Assert.greaterThan(uint(2), uint(1), "2 should be greater than to 1");
        Assert.lesserThan(uint(2), uint(3), "2 should be lesser than to 3");
    }

    function checkSuccess2() public pure returns (bool) {
        // Use the return value (true or false) to test the contract
        return true;
    }

    function checkFailure() public {
        Assert.notEqual(uint(1), uint(1), "1 should not be equal to 1");
    }

    /// Custom Transaction Context: https://remix-ide.readthedocs.io/en/latest/unittesting.html#customization
    /// #sender: account-1
    /// #value: 100
    function checkSenderAndValue() public payable {
        // account index varies 0-9, value is in wei
        Assert.equal(msg.sender, TestsAccounts.getAccount(1), "Invalid sender");
        Assert.equal(msg.value, 100, "Invalid value");
    }
}
EVM Version
There are many versions of the Ethereum Virtual Machine (EVM) – the part of the Ethereum node that runs the opcodes when executing a smart contract. As new updates to Ethereum come out, they release updated EVM versions. All EVM versions are named after cities (London, Paris, Shanghai, etc.), and there are over a dozen EVM versions so far.
We are specifically using the London version of the EVM for the course blockchain. The default is Shanghai, which is newer. The Shanghai version is a super-set of the London version – which means any London EVM program will work just fine in Shanghai. However, a program targeted for the Shanghai EVM will not work on a London EVM. You will have to make a few changes in Remix to ensure that you are targeting the London version rather than the Shanghai version.
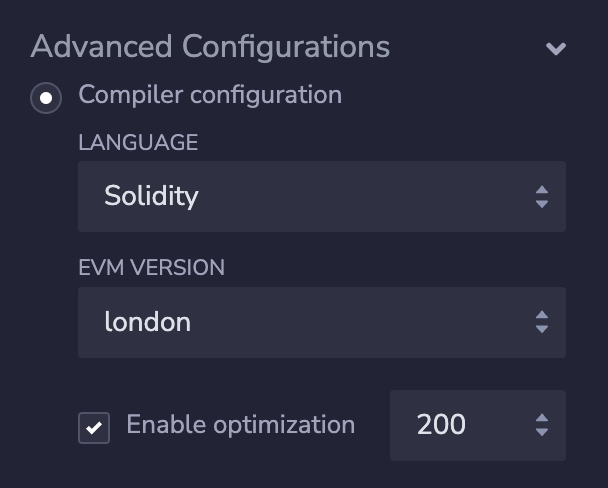
To target the London EVM, on the compilation pane, click on the “Advanced Configurations” drop-down, then on the “EVM version” drop-down, then select “london” (“shanghai” or “default” will likely be selected). You have to re-compile it after you make this change. You can see this in the image to the right, which shows only the relevant part of the Compilation pane.
This doesn’t matter when targeting the Javascript blockchain emulator – which is why you left it as “Remix VM (Shanghai)” above. As the Shanghai is a super-set of London (mostly), you can compile it under either, and it will run just fine on the “Remix VM (Shanghai)” environment that you used, above.
The difference matters on the course blockchain – that is only set to London, and a program compiled for the Shanghai EVM will NOT work. Fortunately, Remix will let you know if you try to deploy a Shanghai EVM targeted smart contract on a London blockchain (like our course blockchain) – Remix will complain that the PUSH0 opcode will fail (that opcode is new to Shanghai, but not in London).
Why not use the latest version? Because the latest version (Shanghai) requires a lot of additional configuration, as it uses something called the Beacon Chain, which is a second blockchain. The London version does not use this, so the configuration on our end is much easier. If we were to use Shanghai, we would have to set up another program, similar to geth, to sync another blockchain that geth would then interact with. The functionality for running smart contracts is the exact same – there is no difference in the code it can compile.
Part 3: Deployment
At this point we can edit, compile, and test our program on Remix. We have also made changes to the addChoice() calls in the Poll.sol constructor, as well as to the purpose string. Now we are going to use Remix to deploy to our private Ethereum blockchain.
Start geth
We need to start geth, as we did in the connecting to the private Ethereum blockchain assignment.
Once that command is run to start the local node, you will see a line that says, “HTTP server started”, which is what the various options in the geth-config.toml file did. Note that these particular options will only allow the Remix that we are using – either as a stand-alone IDE or through the browser – on the same machine to connect. So you can’t run geth on another host (VirtualBox, Amazon AWS, etc.) and Remix on your host machine, for example.
Now that geth is started, we have to attach to it IN A SEPARATE WINDOW via geth attach /path/to/ethprivate/geth.ipc (or, in Windows, either geth attach ipc:\\\\.\\pipe\\geth.ipc or geth attach \\.\pipe\geth.ipc). Wait for it to finish syncing (check eth.syncing). Then eth.blockNumber should match the highest block number on our Ethereum blockchain explorer.
Just to check: at this point, you should have TWO geth processes running in separate windows. The first is the full node with the five or six additional flags as above. The second is a geth terminal via geth attach.
Configure Remix
You should have Poll.sol loaded into Remix, and you should have made the modifications to the addChoice() calls in the constructor and the value of the purpose string. You should have compiled it WITHOUT optimizations.
Read these instructions through before starting them!
- Change to the Remix deployment tab ().
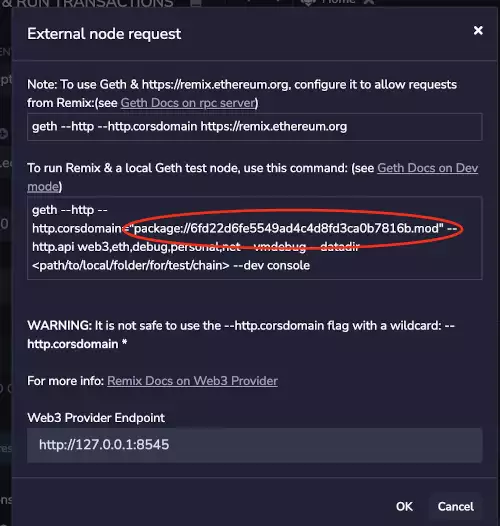
- Under ‘Environment’ select “External Http Provider”. The pop-up window will tell you the options to run geth with, and you have already done that, above. Ensure that the “Web3 Provider Endpoint”, in the pop-up box, says
http://127.0.0.1:8545.- If you are using the Remix IDE, the pop-up window in Remix will tell you what you will need to use as your endpoint value. This is presented as a value after the
--http.corsdomaincommand-line parameter. See a screen shot of that value here. We are going to put it into ourgeth-config.tomlfile as the second value in the list for theHTTPCorskey (keep that first value in that list!). You will need to restart the geth node once you have made that config file edit (and possibly re-attach the geth Javascript terminal). - Click OK to close that pop-up window
- Note to Mac OS X users: if you are doing this assignment on remix.ethereum.org in Safari, then this is the part that Safari seems to have issues with. If it is not working for you, then please switch to a different browser (Firefox or Chrome both seem to work fine). You can then cut-and-paste your code from Remix in Safari to remix in Firefox / Chrome.
- If you are using the Remix IDE, the pop-up window in Remix will tell you what you will need to use as your endpoint value. This is presented as a value after the
- Underneath the “Environment” drop-down box, it should now say, “Custom (12345678) network”, with the chain number of our private blockchain instead of 12345678.
- You should see your geth account address(es) populated in the “Account” drop-down box, with your
eth.coinbaseone selected - If there are any entries listed under “Deployed contracts” (in the left-hand pane), you can delete them – this way we won’t mix up any previous deployments (to the simulated blockchain) with the one we are about to do (to the private course blockchain)
- Under ‘Environment’ select “External Http Provider”. The pop-up window will tell you the options to run geth with, and you have already done that, above. Ensure that the “Web3 Provider Endpoint”, in the pop-up box, says
- Unlock your account in geth
- In the geth terminal, run the
personal.unlockAccount()command. You can run it aspersonal.unlockAccount(eth.coinbase,"password",0)– filling in your own password – to unlock it until the end of the session. It should report backtrue. - Note your balance – enter
web3.fromWei(eth.getBalance(eth.coinbase), "ether"). You can also see your balance in Remix – in the Deployment pane, when selecting the account, it will state the balance next to the account number. - Errors:
- Did you get “ReferenceError: personal is not defined”? Then you forgot to add the
--rpc.enabledeprecatedpersonal, described in the private Ethereum blockchain (md) assignment - Did you get “etherbase must be explicitly specified”? Then you forgot to run
miner.setEtherbase(eth.accounts[0])in the geth-attach Javascript terminal, as described in the private Ethereum blockchain (md) assignment
- Did you get “ReferenceError: personal is not defined”? Then you forgot to add the
- In the geth terminal, run the
- Hit Deploy!
- This what this party is all about! Click the orange Deploy button.
- The Remix console (under the editing box) should say, “creation of Poll pending… view on etherscan”
- Note that this submitted it as a transaction, but it is not (at first) on the blockchain
- As our blockchain auto-mines all transactions, it should take effect very quickly (a few seconds)
- You should see a green icon as the final result, not a red icon
- See what happened
- Look at your new balance in the geth terminal via
web3.fromWei(eth.getBalance(eth.coinbase), "ether"). You will see that your gas fees were deducted.- Look back at the Remix console – it will say something like,
[block:12345 txIndex:0] from: 0x123...bcdef to: Poll.(constructor) value: 0 wei data: 0x608...57221 logs: 0 hash: 0x123...bcdef- Note the block number (shown in the previous line as 12345) where the transaction occurred
- Click on the arrow to the right of the “Debug” button in the console – this will list the details of the transaction that was mined into the blockchain
- The contract address is listed in the left-hand pane, under the deploy button (in the “Deployed Contracts”) section)
- Save the contract address – there is a copy icon to easily copy it – as you will need to submit that
- Note: sometimes Remix will appear to hang when deploying the contract, and will not respond with a contract address. If this happens, you can view the results of the deployment via the blockchain explorer – just search for your coinbase account, and see the most recent transaction it made.
- You can view the information for that transaction on our blockchain explorer – the block that contained the transaction that deployed your smart contract, the transaction itself, and the account that is the contract address
- You may have to wait up to a minute for the explorer to refresh the information from the blockchain
- Look back at the Remix console – it will say something like,
- Look at your new balance in the geth terminal via
- Call some methods on your contract
- If you expand the specific deployed contract, you can see the various methods that it provides. Call the blue buttoned methods, which are the ones that are read-only methods (and thus do not require writing a transaction to the blockchain) –
num_choices(),choices(),voted(), andunnecessaryFunction().- To see if you have voted, click the copy icon to the right of your account drop-down box to copy your account address, then paste that into the ‘voted’ box and click ‘voted’ – it should show false, but you will have to click on the down arrow to the right of the ‘debug’ button that appeared to see that return value
- Vote for your choice! Enter a number in the ‘vote’ box for your choice, and click ‘vote’
- You will see “transact to Poll.vote pending …” in the console – it’s waiting for the transaction to make it onto the blockchain
- It should be auto-mined very quickly (a few seconds)
- In the console, click the down-arrow to the right of the ‘debug’ button that appeared – it lists the transaction hash. You can view that on the explorer as well
- You will need to submit the transaction hash where you voted
- You can call ‘voted’ again with your coinbase account; it should return true this time
- The distinction between the method types here is important.
viewandpuremethods do not require writing to the blockchain, so they will report back the answer immediately – and without having the call mined into a block. Other transactions require the method call to be sent as a transaction to the blockchain and then mined into a block before reporting the success (or failure) of the method call.
- If you expand the specific deployed contract, you can see the various methods that it provides. Call the blue buttoned methods, which are the ones that are read-only methods (and thus do not require writing a transaction to the blockchain) –
- View in the explorer
- We are going to see some additional functionality in the blockchain explorer. The explorer updates every minute, which means you may have to wait up to a minute before you see your transaction reflected in the explorer.
- Search for the particular contract – enter the contract address for your deployed Poll contract in the search box in the upper-right of any page
- In the page for the contract, notice that the explorer is able to identify that this contract implements the IPoll interface (the
interfacesImplementedentry). We’ll discuss the IERC165 interface later in the course. It does this by checking the result of callingsupportsInterface(), which we provided the code for in Poll.sol - Look at the transaction list at the bottom of the contract page. The lowest one is the deployment of the contract itself (it will have a value in the contract address field). The other entry is when you voted on it.
- Click on the transaction hash value for the deployment transaction (the bottom entry in the transaction table). This brings up the transaction page; of the fields there, notice that the
inputfield lists the size of the contract – about 5.5 Kb. If we had optimized it during compilation, it would be about 3 Kb. - Go back to the page for the contract. Click on the transaction hash for the other transaction (the one where you voted).
- Notice that there are two new fields being shown –
functionCallandinputDecode.- Because the IPoll interface is known to the explorer, it can determine which function was called, which is displayed in the
functionCallfield - The actual parameters passed in during the call is shown in the
inputDecodefield - If there was a return value, that would be shown in a
returnValuefield, which is not present in this example- IMPORTANT: Often Remix cannot determine the return value of transactions (it always can for
viewandpurefunctions). If this is the case, you can view the transaction in the explorer.
- IMPORTANT: Often Remix cannot determine the return value of transactions (it always can for
- These two (or three) fields are only displayed when the transaction is a function call
- Because the IPoll interface is known to the explorer, it can determine which function was called, which is displayed in the
- Don’t close down Remix!
- You are going to need it open and with the Poll.sol compiled, for task 5, below
Part 4: Web Interface
We wanted to show you that you can create a web page to interact with a smart contract on the blockchain. The code of the poll viewing web page uses the web3 Javascript library, which is what allows you to connect to the blockchain from Javascript. In our case, we use it to connect to a node running geth that is connected to our private course blockchain. The URL for this web page is linked to from the blockchain explorer (in the section for this semester’s links) – once there, enter your smart contract’s contract address (with the leading 0x) for your deployed smart contract, and it will display the choices.
You are not expected to understand any of the code on that web page! This will be gone over in future assignments, and you will be writing multiple web pages toward the end of the semester to interact with the blockchain. But not now.
On the course blockchain explorer, you can find other contract addresses – look at the transactions page, and see which ones have a value listed in the ‘contract address’ column. You can also view just the contract accounts as well. You can click on a contract address to see which interfaces it implements – if it implements the IPoll interface (which it does via the supportsInterface() function), then you can copy that address and use it in the poll viewer web page. This allows you to see what choices your classmates selected. You are welcome to vote on their polls, but that is not necessary (see the next section for how to do this). Note that you won’t know who deployed that particular smart contract. Also note that this web page will only work with the version of the Poll code used in this assignment. Specifically, it will only work with a smart contract that has the same ABI that IPoll.sol generates; you can see that ABI in the Javascript source code of the poll viewer web page.
How this all works is beyond the scope of this assignment, but will be something we will be going over later in the semester. Feel free to look over the Javascript code in that web page – the only other requirement is that a local geth node has to be running on the server with some additional configuration parameters in geth-config.toml to allow the web page to connect to it (we have not seen those flags yet). One can also have a web page initiate a transaction onto the blockchain, such as casting a vote – we will see that in a future assignment as well; that requires a browser plugin, such as MetaMask, that allows for posting of transactions to a web page using a specific Ethereum account.
Part 5: Vote!
I have loaded a Poll smart contract onto our private Ethereum blockchain, and you all must vote! The only information we will tell you is that the contract address for this is shown on the blockchain explorer (in the section for this semester’s links), and that it fulfills the IPoll.sol (src) interface. You have to figure out what the options are, and then vote for one. This one poll cannot be viewed through the poll web page viewer. You will need to submit the transaction hash where you voted.
In Remix, you can call a different contract with the same codebase. In particular, it has to have the same ABI. For this, you can (and should) use the IPoll.sol file. Specifically, you should NOT use Poll.sol, as you do not know if additional functions (such as unnecessaryFunction()) are in the deployed contract; only that it implements the functions in IPoll.sol. On the blockchain explorer (the links section) is the address of a deployed Poll contract – copy that address.
In Remix, in the Deployment pane, switch to IPoll. Switch to the compilation pane, and click “Compile IPoll.sol”. Then switch to the deployment pane. At the bottom, and above the “Deployed contracts” list is a blue “At Address” button – copy the contract address there, and click that button. This now gives us a connection to a different IPoll implementing contract. Use this to vote. You have to vote on the course poll. You are welcome to vote (or not) on your fellow classmates polls; how to find their contract addresses is described above.
Note that Remix may complain if an Ethernet address is not checksummed. This is a warning, not an error, and it should still work fine. (Although it will become an error when such an address is in code being compiled.) But you still have to remove the warning, otherwise the compilation when you submit code containing non-checksummed addresses it will appear to fail when you submit your code to Gradescope. Remix will provide, in the warning, the checksummed address – you are welcome to use that value (cut-and-paste it into your code) instead to silence this warning. You can also use ethsum.netlify.app to checksum an Ethernet address.
The assumption is that the account you will vote with is your eth.coinbase account. It’s fine if you want to use a different account address than you used in the last assignment, but when you submit your information at the end of this assignment, be sure to submit the account that you used for the deployment and voting herein. As your account information will be in the voted mapping, we will be able to determine who has voted and who has not. You get credit for this part as along as you vote on the course smart contract; it does not matter what choice you vote for.
Part 6: Closing down
Please turn off your geth node when you are done with this assignment. You can always turn it back on again when needed.
Submission
You will need to fill in the various values from this assignment into the dappintro.py (src) file. That file clearly indicates all the values that need to be filled in. That file, along with your Solidity source code (only Poll.sol), are the only files that must be submitted. The sanity_checks dictionary is intended to be a checklist to ensure that you perform the various other aspects to ensure this assignment is fully submitted.
There are three forms of submission for this assignment; you must do all three. Other than the Gradescope submission, they are all listed in the sanity_checks dictionary.
Submission 1: You must deploy your Poll smart contract to our private Ethereum blockchain. It’s totally fine if you deploy it a few times to test it – just submit the information about the most recent submission. The contract address of this deployment are entered into the dappintro.py file that you submit.
Submission 2: You must vote on both your Poll contract and also on the course-wide Poll contract. The transaction hashes for these two transactions are entered into the dappintro.py file.
Submission 3: You should submit your Poll.sol file and your completed dappintro.py file, and ONLY those two files, to Gradescope (don’t submit IPoll.sol). All your Solidity code should be in the first file, and you should specifically import the IPoll.sol interface. The IPoll.sol file will be placed in the same directory on Gradescope when you submit so that it can compile. NOTE: Gradescope cannot fully test this assignment, as it does not have access to the private blockchain. So it can only do a few sanity tests (correct files submitted, successful compilation, valid values in dappintro.py, etc.).