PDR: Laboratory 10: Huffman Coding
Go up to the Labs table of contents page
Objective
- To become familiar with prefix codes
- To implement a useful application using a variety of data structures
- To analyze the efficiency of your implementation
Background
In lecture we discussed Huffman coding and the construction of prefix code trees. We have also covered a variety of data structures this semester: lists, trees, hash tables, and heaps. Several of these may be useful for this lab. In addition, in this lab you are required to think about the underlying representation and efficiency of these structures.
Tutorial
There is no tutorial for this lab.
Recommended Readings
- The Heaps and Huffman slide set are available in the repository, and that covers Huffman compression and decompression.
- Code for binary heaps is also available from that slide set: binary_heap.cpp (src), binary_heap.h (src), heap-test.cpp (src).
Lab Procedure
Pre-lab
- Create a heap
- Implement the Huffman encoding (compression) routine using your heap
- Files to download: fileio.cpp (src), and the example files (in the labs/lab10/examples/ directory), or as one examples.zip file)
- Files to submit: heap.cpp, heap.h, huffmanenc.cpp, Makefile (you can
submit additional .cpp/.h files, if needed, as long as it compiles with
make)
In-lab
For spring 2022, there is an extension to the in-lab due date; see the daily announcements for details.
- Implement the Huffman decoding (decompression) routine discussed in the in-lab section
- Files to download: inlab-skeleton.cpp (src), and your pre-lab files
- Files to submit: huffmandec.cpp, Makefile (you can submit additional
.cpp/.h files, if needed, as long as it compiles with
make)
Post-lab
The post-lab is cancelled for the spring 2022 semester.
Analyze the time and space complexity of your encoding and decoding codeCreate a Makefile to compile both the encoding and decoding portions of your Huffman routine in one stepFiles to submit: Makefile, all necessary source code files
Huffman Encoding and Decoding
There are a few points that apply to the Huffman implementation as a whole that are important to keep in mind.
Requirements
Your Huffman implementation should:
- Case-sensitively encode and decode only printable ASCII
characters
- Newlines, tabs, etc. are not printable, while spaces are
- The lecture notes describe which characters are to be encoded
- Read and write ASCII characters rather than individual bits
- Yes, this means that the actual size of our compressed file will be
larger than our original file (terrific, you “compressed” the character
tinto the five characters01011), but it will simplify the lab considerably
- Yes, this means that the actual size of our compressed file will be
larger than our original file (terrific, you “compressed” the character
- Use a heap (priority queue) data structure
- You may NOT use the STL
priority_queue - You may use the heap code from the slides as long as you cite it
- You may NOT use the STL
Efficiency
You will need to select several different data structures to implement Huffman compression and decompression. Don’t get more complicated than is necessary, but do keep efficiency in mind. Consider the following questions:
- What will be the most common operations required on each data structure?
- How much time and space will be required?
Use the answers to these questions to guide your selection. Your solution will be judged slightly on how efficient it is (both in terms of time and space). Very inefficient solutions will lose a few points. Be sure you have a good explanation for your implementation choices:
- Do you predict better data locality?
- Does a purely Big-Theta analysis not tell the whole story?
Whatever your implementation, you should be able to accurately describe its worst case Big-Theta performance both in running time and space (memory) usage.
One thing we have not dealt with in previous labs is serializing various data structures (writing them to a file or standard output, and reading them back in). You will need to do this with your prefix code tree. The fact that you must read this data structure from a file and write to standard output may affect how you choose to represent it in your program. Keep in mind that the format for how to write it to a file is fixed, as described in the pre-lab section. You will need to re-create your Huffman coding tree from the first part of that file format.
Pre-lab
For the pre-lab, you will implement, in huffmanenc.cpp, the Huffman encoding algorithm using a binary heap that you implement in heap.cpp/h.
The basic steps for compression are:
- Read the source file and determine the frequencies of the characters in the file
- Store the character frequencies in a heap (priority queue)
- Build a tree of prefix codes (a Huffman code) that determines the unique bit codes for each character
- Re-read the source file and for each character read, write its prefix code to the output, following the file format described below
Your program must take in a single command-line parameter, which is the name of the file whose contents will be encoded. We have some sample plain text and encoded text files (in the labs/lab10/examples/ directory) – a description of these files is in the in-lab section.
Your program should output to the standard output
(i.e. cout) the exact file format described below, and
nothing else.
As part of the file format described below, your program will need to print out the compression ratio and the Huffman tree cost. The compression ratio is defined, in bits, as: (size of the original file)/(size of compressed file). You should exclude the size of the prefix code tree in the compression ratio, and assume that the 0’s and 1’s you generated for the compressed file count as one bit each (rather than an 8-bit character). The Huffman tree cost is the same as described in lecture.
To read in the input file character by character, see the fileio.cpp (src) file.
File Format
In an effort to simplify both the in-lab implementation and the
grading, there is a very strict file format for a Huffman encoded
message for this lab. This allows the two parts to be developed,
implemented, and tested separately. Although real Huffman encoding uses
bits, we will write these bits to a file using the characters
0 and 1, as that will make it easier to check
and debug our code.
There are three sections to an encoded file, each separated by a specific separator.
Section 1
The first section of the file are the ASCII characters that are
encoded, followed by their bit encoding. Only one such encoding per
line, with no blank lines allowed. The format for a line is the ASCII
character, a single space, and then the 1 and
0 characters that are the encoding for that character,
followed by a newline. The order of the lines does not matter. If the
character being written is the space character itself, you should write
space instead of ” “; thus a line for the space character
might look like: space 101010. Keep in mind that the first
character on this type of line cannot be a newline, tab, or a
non-printable character. No line in this part can be more than 256
characters. You can safely assume that the data provided will be a valid
Huffman coding tree (i.e. there won’t be an internal node with one
child, etc.).
Following that is a separator line, and is a single line containing 40 dashes and no spaces.
Section 2
The second section is the encoded message, using the characters
0 and 1. You may optionally separate each
encoded character by any form of whitespace. For example, to help
debugging, you might want to separate each encoded letter by a space and
place each encoded word on its own line.
The next line is a separator, and is also a single line containing 40 dashes and no spaces.
Section 3
The last section of the file displays several stats about the compression. You should output the total number of symbols encoded, how many unique symbols are used, the number of bits in the original and compressed files, the compression ratio to five decimal places, and the cost of the huffman tree to five decimal places. The output format should look exactly as shown below. The information is required as we will be grading your submissions with these results. All floating point results must be reported to 5 decimal places.
The following is the Huffman file format for the example in the slide set that has the characers ‘a’, ‘b’, ‘c’, and ‘d’.
a 0
b 100
c 101
d 11
----------------------------------------
11 100 0 101 0 0 11
----------------------------------------
There are a total of 7 symbols that are encoded.
There are 4 distinct symbols used.
There were 56 bits in the original file.
There were 13 bits in the compressed file.
This gives a compression ratio of 4.30769.
The cost of the Huffman tree is 1.85714 bits per character.
The Huffman tree that this forms is the same as the one shown in the slide set), and is duplicated below.

Note that your encoding does not have to exactly match – in particular, the bits that your program uses to encode it will depend on the implementation of your heap. So while your bits can be off, the number of bits for each character should NOT be different than the examples given. For example, in the output above, if b was given the prefix code 101 and c was given 100 (i.e., b and c have their codes swapped), then that is ok. The statistics in section 3 of the output will be the same.
Hints
A few hints from experience with this in previous semesters.
Take the time to understand the code
Just copying the supplied code verbatim will not help you, as you need to understand what is going on – the code does not work “out of the box.” Either make sure you understand it, or write your own code.
Need a pointer or two?
It will be far easier to put HuffmanNode pointers in
your heap, rather than HuffmanNode objects (or whatever your Huffman
tree nodes are called). If you put the actual objects in, then you are
going to run into problems with scoping issues, inadvertent calls to
operator=(), etc. Trust us, stick with the pointers.
Okay but actually
You will need some secondary data structures in order to hold all the information necessary for compression. You’ll need some way of holding the frequencies of each character, as well as each character’s prefix codes – what would be efficient data structures to store and retrieve that information?
Getting the prefix codes
The best way to do this is recursively. Once you have your Huffman tree, you can recurse down both sides of your tree to grab every prefix code and print them out.
In-lab
For the in-lab, you will implement, in huffmandec.cpp, the Huffman decoding algorithm.
The basic steps for decompression are:
- Read in the prefix code structure from the encoded file
- Re-create the Huffman tree from the code structure read in from the file
- Read in one bit at a time from the encoded file and move through the prefix code tree until a leaf node is reached
- Output the character stored at the leaf node
- Repeat the last two steps until the encoded file has been entirely decoded
First, make sure that your code can read in encoded files – you can download the inlab-skeleton.cpp file, which can properly read in the encoded input files.
Next, create the Huffman coding tree from the prefix codes you read in from the input file. Not creating a Huffman tree from the file will result in zero credit for the in-lab. The whole point of this part is to create the tree!
Lastly, read in the second part of the file, traverse your Huffman tree, and output a character whenever you reach a leaf node. For this lab, you must only print out the decoded message and nothing else.
We provide a number of sample files for you to test your code with. A
brief description of each is described here. The “normal” files are the
English input. The “encoded” files are the Huffman encoded files,
following the file format described above. Except where indicated, the
second section of each encoded file (the digits 0 and
1) has a space inserted between each letter from the
original file, so that you can see which letter is encoded as which
bitcode.
- normal1.txt / encoded1.txt: This is the first example
from the lecture slides (
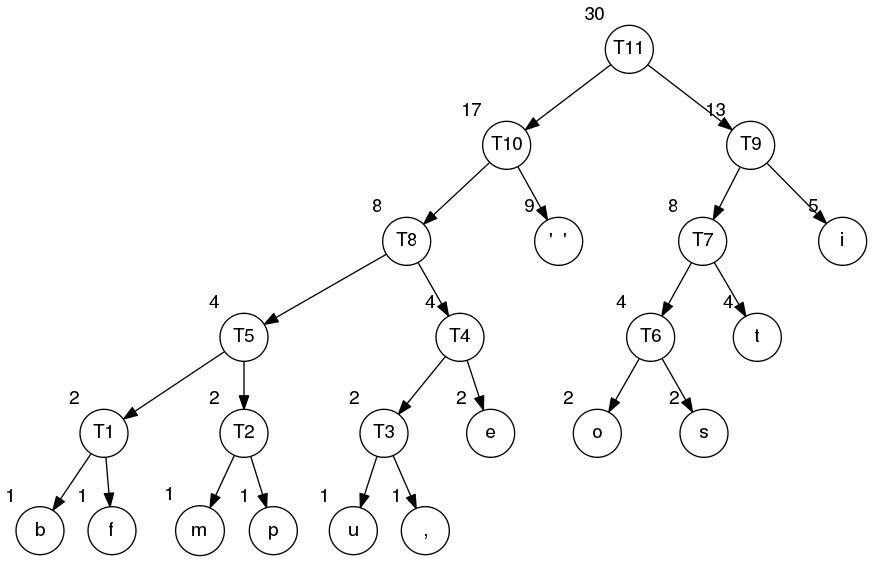
dbacaad). The Huffman tree can be viewed here. - normal2.txt / encoded2.txt: This is the second example from the lecture slides, in the “Huffman Encoding” section. This is the example that we built up the Huffman tree from. The Huffman tree can be viewed here.
- normal3.txt / encoded3.txt: This is a paragraph from Gadsby, which is a novel that does not ever use the letter ‘e’.
- normal4.txt / encoded4.txt: The first paragraph from
a front
page story in the 27 November 2007 edition of the Cavalier Daily.
- encoded4a.txt: This is the same
encoding as encoded4.txt, but with
all spaces in the second section of the file removed, so that it’s just
a very long string of
0s and1s.
- encoded4a.txt: This is the same
encoding as encoded4.txt, but with
all spaces in the second section of the file removed, so that it’s just
a very long string of
Hints
More data structures
Like the pre-lab, you’ll need some way to store the prefix codes for each character. Unlike the pre-lab, though, you don’t need to deal with frequencies anymore. The prefix codes is enough to generate the Huffman tree, which you can then use to decode the input file.
Creating the Huffman tree
As you are (recursively) creating each node in the tree, you know the
prefix code to get to that node (remember that following a left
child pointer generates a 0, and following a right child
pointer generates a 1). If that prefix is one of the listed
bitcodes in the first part of the file, then we know we are at a leaf
(remember that all characters in a Huffman tree are leaves). Otherwise,
we are dealing with an internal node and you will have to create left
and right child nodes, calling yourself recursively on each one. Keep in
mind that when you call yourself recursively on the left child, you have
to add 0 to the end of the prefix; likewise, you have to
add 1 to the prefix for the right child. This algorithm
will require you to search through the bit codes that were read in from
the first part of the file. Also keep in mind that the size of the input
here (the number of characters) is very small (only 80 or so) – which
means that if you choose a linear time complexity data structure
(vector, for example), your code will run just fine.
Post-lab
The post-lab is cancelled for the spring 2021 semester.
There are two parts to this post-lab: the time and space
complexity analysis and submitting all your (working) code
again.
Time and Space
Complexity
For the post-lab, we want you to think about the time and space
complexity analysis of your compression and decompression code. You
aren’t required to submit anything for this part, but you should think
carefully about the following points, as you may need to know them on
exams. See below for a discussion about the space/time
complexity.
Think about your implmentation: what data structures did you use in your implementation and why did you selected them.Analyze the efficiency of all steps in Huffman encoding/decoding. For each of the steps of compression and decompression (see “Huffman Encoding and Decoding”), what is:The worst case running time of your implementationThe worst case space complexity of your implementation
Worst case running time – for this be sure to consider all steps
of the compression and decompression. You can leave off the cost of
calculating the compression ratio, printing the cost of the tree, and
printing a listing of the bit code for each character that was asked for
in the pre-lab. Refer to the list of steps given earlier in the
lab.
Space complexity – for this, you should calculate the number of
bytes that are used by each data structure in your implementation. The
easiest way to do this is to step through your code, just as you have
done for the worst case running time, and make a note each time you use
a new data structure. You do not need to take into account scalar
variables (loop counters, other singleton variables), focus on the data
structures whose size depends on values such as the total number of
characters and the total number of unique characters, and use those
values in your answer.
Again, you aren’t required to submit anything for this section,
but you should use these points as a way to reflect on the work you have
done for the pre-lab and in-lab.
Bringing it all
together
The purpose of this part of the post-lab is to clean up your
code from the pre-lab and in-lab, and submit all of it together. If your
pre-lab and in-lab code work properly, then there is no futher clean-up
to do; however, you must still submit the files along with a
new Makefile.
When we run make, the code should be compiled into
two executables: encoder and decoder, which
are the pre-lab and in-lab code bases, respectively. Unlike the pre-lab
and in-lab, you should NOT name your
executables a.out! After compiling your code with
make, we will test it as such:
./encoder testfile.txt > encoded.txt
./decoder encoded.txt > output.txt
diff testfile.txt output.txt
This encodes a sample text file, then decodes it. Both the
original file (testfile.txt) and the final file
(output.txt) should be the same, which is what the
diff command checks. If there are no differences between
the two files, then diff will not print any
output.
Hints
Two executables???
Up until now, all of our Makefiles have generated a single
a.out from the inputs given through OBJECTS.
Now that we have two separate executables we need to create, you may
need some way to differentiate between the object files for each
one…
Naming the executables
Remember the -o flag for clang++? :)