SLP: Django: Getting Started
Go up to the main SLP documents page (md)
Python version
On both the course server and the VirtualBox image, there are two
versions of python installed. It is the system default version
(python -V) that is used in the WSGI module (which is what
runs the Django project in the web server). As of the writing of this
tutorial, that is version 2.7.12. Running python3 -V
indicates that Python 3.5.2 is also installed. These are the defaults
for a stock version of Ubuntu 16.04 as of the writing of this document
(August 2017).
Install Django
Django has already been installed on the VirtualBox image provided, the docker image provided, as well as on the course server.
To install Django on your own system, under Ubuntu 16.04, you need to
install pip, the Python package manager:
sudo apt-get install python-pip. If it is not installed,
you will also want to install the python-mysqldb package so
that Python can connect to the MySQL database. You can then install
Django via sudo pip install Django==1.11 (you may want to
see if there is a newer release available than 1.11, which was the most
recent release as of the writing of this document). Note that installing
the python-django package under Ubuntu will NOT work, as that is a
previous Django version.
Setting up a new Django project
Much of these directions are based on the Django intro tutorial from Django Project. These directions are for Django version 1.11; if a newer version is released, then and you have to change the tutorial page version, via the link in the lower right, to 1.11, which is the version we are using.
To create a Django project, follow these steps. They are adapted from part 1 of the Django tutorial.
- Enter
django-admin startproject mysite. This will create amysite/directory with a bunch of files in it.- For the Frameworks homework (md), you probably will want to use “djangohw” as the project name
- You will need to change all instances of “mysite” in these directions to your actual project name (“djangohw”, or whatever).
- Note that you can call the binary
django-adminordjango-admin.py, as the former just invokes the latter. - The Django directory that is created should be in your home directory on the course server.
- To view your project, you can run
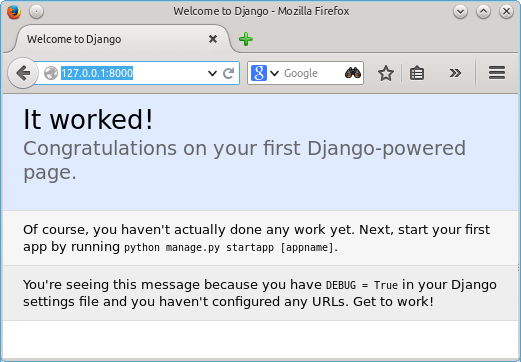
python manage.py runserverfrom inside themysite/directory. This will print a URL, such ashttp://127.0.0.1:8000/– you can view that URL in your browser, and it should look exactly like the image at the very bottom of this page. This will only work locally, though – you can’t view a Django project shown via the “runserver” command from the course server very easily (at least, not without redirecting ports). - To update the database information, edit
mysite/mysite/settings.py- To use MySQL, change the
ENGINEvalue inDATABASESfromdjango.db.backends.sqlite3todjango.db.backends.mysql - Enter values for your DB credentials:
USER,NAME,PASSWORD, andHOST. - A completed
DATABASESsection might look like the following:
DATABASES = { 'default': { 'ENGINE': 'django.db.backends.mysql', 'NAME': 'mst3k', 'USER': 'mst3k', 'PASSWORD': 'password', 'HOST': '127.0.0.1', } }- Note that there is no easy way to add a DB table prefix to every table – instead, you would have to specify the name of every table that Django uses. You can see a whole bunch of people getting all twitchy over this here.
- And edit
TIME_ZONEto match our time zone. The particular value you want there is ‘US/Eastern’.
- To use MySQL, change the
- From the
mysite/directory, runpython manage.py migrate. This will set up the DB tables.- The ‘superusers’ that it prompts you for are a login for your web system – you can use your userid, and pick any password that you’d like. Note that by setting the username and password here, you can skip the “Create an admin user” section at the top of page 2 of the Django tutorial.
At this point, you Django project is up and running, even if it doesn’t do much. You can now start about half-way down on the Django tutorial, part 1 page (start at the “Creating models” section).
Viewing it locally
As mentioned in part 1
of the Django tutorial, to view your Django project locally, you run
python manage.py runserver, and then view it in the URL
provided (likely http://127.0.0.1:8000/).
Registering the Django project with Apache on the course server
When running it locally, you view it via
python manage.py runserver. But on the course server, you
will have to configure it run through the apache web server. These
directions are specifically for the course web server; the VirtualBox image (md) has NOT been
configured to allow this to work (on the VirtualBox image, just use the
“runserver” command).
When you have created your Django project, you will need to tell the
web server that your file exists. The module that runs Python projects
on the Apache web server is called WSGI (Web Server Gateway Interface),
pronounced “wus-gee”. On the server, there is a wsgi-admin
command-line tool to do exactly that, since you can’t edit the web
server configuration files yourself. Note that you can only have one
WSGI project registered at a time. You will need to find the wsgi.py
file in your Django project (likely in
mysite/mysite/wsgi.py, where mysite is the
name of your Django project).
There are four main “modes” to that command:
-registerwill register a wsgi file, supplied with the-fileflag-listwill list your existing entry, including the ID (which is needed to remove that entry)-removewill remove a previously registered wsgi file via entry’s ID number, which is specified via the-idflag-regeneratewill regenerate the web server configuration files and reload the web server. This is automatically done on a-registeror-remove. But it could be the case that somebody accidentally deleted their Django project files, which will cause the WSGI module to cause ALL of the WSGI projects to stop working – the-regeneratecommand will re-create the configuration files without the missing Django projects.
There are a few other flags to the above:
-file <wsgi_file>specifies which file to register; it must be thewsgi.pyfile-id <id_num>will remove the wsgi file entry with the specified integer ID; the IDs can be found via the-listflag-compactwill cause the output of the-listto be one line per entry-staticdir <dir>specifies what the static directory is; this must be a full path name (the default is a static/ sub-directory under the main project directory)
Lastly, there are a few flags that are restricted as to who can use them (meaning only the root user can call these flags):
-uid <uid_num>will register the wsgi file as a different user (you can find the UID of a user viagetent passwd <user>)-nocheckwill skip the check as to whether the passed wsgi file is a valid wsgi file or not-rootwill register the file as http://server/user, rather than http://server/django/user-allwill list all the registered wsgi files, including the ones that have been removed
So, to register your file for the tutorial:
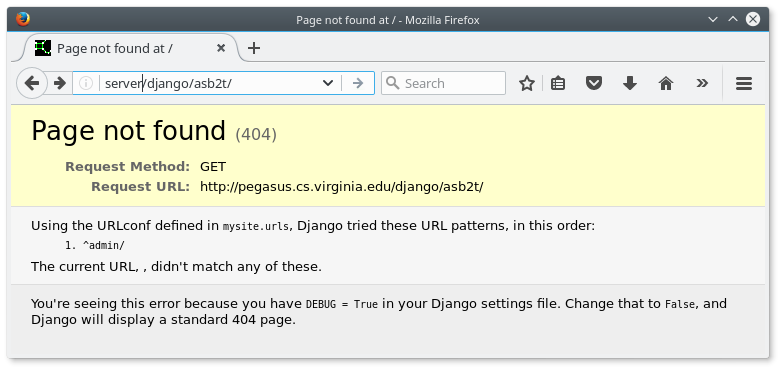
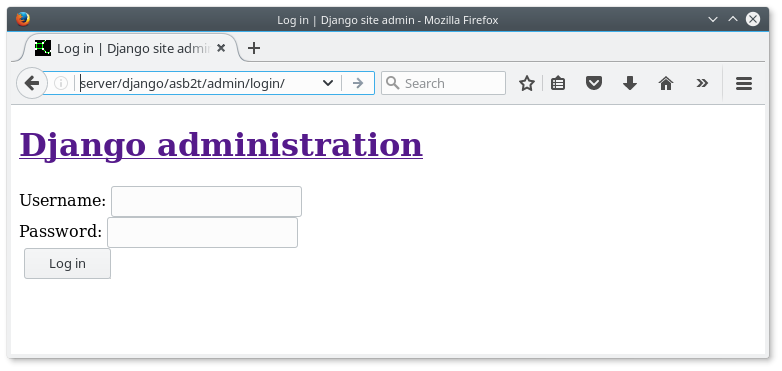
wsgi-admin -register -file mysite/mysite/wsgi.pyIt doesn’t matter what directory you run this command from, as long as you specify the correct wsgi.py file – there is only one in the Django project directory that you have created. Once done, you should be able to view the project online at http://server/django/mst3k/, where “mst3k” is your userid. Note that this URL will give you a “Page not found (404)” error on a YELLOW background, which is because you have not set up your routing properly. This means that the web server is properly reading your Djagno project, but that your project is not yet properly configured (more on this below). If you get a “Not Found” error on a WHITE background, then either the URL is wrong, or you entered the wrong wsgi-admin command parameters. If you view http://server/django/mst3k/admin, it will present a Django administration login screen, and you can log in with the superuser information that you entered when you created the Django project (step 4 under “Setting up a new Django project”, above).
To find the existing entries that you have:
wsgi-admin -listNote that that command will also tell you the ID of your entry, which is a positive integer. Also note that you can only have one entry per account, so you will have to remove an existing entry if you want to create a new one (or if you want to change any of the settings).
To remove your entry, assuming it has an ID 42 (the ID is found via
the wsgi-admin -list command):
wsgi-admin -remove -id 42Once the system is registered properly, you can view the site at http://server/django/mst3k; you will get the following image. We’ll get it working properly in the “Configuring the Django project” section, below.
Updating the Django project
If you have updated your Django project – meaning you have edited
any of the files – then you will need to tell the web server
that this has occurred. While you can reload the web server (via the
reload-apache2 command), it’s much better to update the
timestamp on your wsgi.py file. To do this, use the touch
command:
touch ~/mysite/mysite/wsgi.pyThis will update the timestamp on the wsgi.py file to the current time. The web server (actually the WSGI module) will detect this, and reload the project.
If you are still running into problems (such as Internal Server
Errors (500)), try reloading the web server via
reload-apache2.
SQLite to MySQL
If you used the docker image, then you likely kept the data for the app in a SQLite3 database. You can use the framework’s command to create the tables. You can use the .dump command to extract the data, and then enter it into the MySQL database on the course server. If you are unsure what the format of the database configuration file should be, create a new app (with a different name) that uses MySQL, and look at the file therein for the format (or just copy the database configuration file over).
It may be that the SQLite dump does not work well under MySQL. One option is to edit the dump extensively, but that is long and annoying to do. Another option is to migrate the DB through the framework on the course server, and re-enter the data into the DB (from the tutorial, copy and paste all the insert commands).
Configuring the Django project
While the project works, many things will still need tweaking.
Setting the static directory
If you look at http://server/django/mst3k/admin (notice the “/admin” at the end), it will look like the following:
You will note that there is no formatting, as the various files needed for that formatting (images, CSS files, etc.) can not be found. These files are called static files, as their content does not change (much).
There are many static files that are needed for a Django project; these are described in more detail in part 6 of the Djago tutorial. Normally, the static files are found in http://server/static. However, as there are many Django projects running on this web server, there are many different static directories, and thus the URL is different: ours will be at http://server/django/mst3k/static.
This tutorial assumes that your static files are going to be kept in
a static/ sub-directory of your project directory (i.e.,
the static/ directory is in the same directory as the
manage.py file). You do not need to make that directory
yet; that will be done below. The wsgi-admin program, which you used
above, makes that assumption (where your static directory is) as well.
If you want your static directory in a different location, then you will
need to re-run the wsgi-admin program (after removing your current
entry) and use the -staticdir flag, which is described
above.
You need to tell the Django project where these files are. In the
settings.py file (which you edited above), you will need to add the
following two lines. The first, STATIC_URL, is the URL
where the static files are found; the second, STATIC_ROOT,
is the filesystem path where the files are found.
STATIC_URL = '/django/mst3k/static/'
STATIC_ROOT = '/home/slp/mst3k/mysite/static/'
Lastly, you need to put all the necessary static files into the correct directory (again, presumably /home/slp/mst3k/mysite/static/). To do this, run (from the main project directory):
python manage.py collectstaticYou will have to confirm that it intends to overwrite files. This command also creates the /home/slp/mst3k/mysite/static/ directory.
Lastly, reload the project (touch mysite/wsgi.py), and
view the admin page again (http://server/django/mst3k/admin); it should
look exactly like the following, other than the userid (if it
does not, then something went wrong):

Once that is done, the tutorial (specifically, part 6) proceeds normally, and no changes to the tutorial are needed.
Configuring the Django project’s URLs
This section assumes that there is a polls app in the
project, which is what is done in the tutorial that is part of the Frameworks homework (md). If you made a different named app, just
replace “polls” with the app name in the instructions below. This
section also assumes you have a default view (we’ll use
index) for that app. This is done in the first half of page 3
of the Django tutorial. If you have not yet added that app
and that view to the project, then this won’t work – come back
to this spot in the instructions when you have added that app (and
view).
Currently, http://server/django/mst3k gives a page not found error, but http://server/django/mst3k/polls works; we are going to redirect the former to the latter. The first half of page 3 of the Django tutorial had you create a polls/urls.py to add the index view. In addition, it had you edit mysite/urls.py to add a “polls” line – this told Django how to route one to the polls app. What we are going to do is to tell Django that if you view the entire project (at http://server/django/mst3k) to also route one to the polls app.
To do this, add a the following line to the following into that urlpatterns array (above the existing ‘polls’ line):
url(r'^', include('polls.urls', namespace="polls")),This will cause the base URL of the Djagno project (http://server/django/mst3k) to display the contents of the polls app.
Initial Djano project image (but only via the “runserver” command!)
If you are running this on the course server, then you will NOT see this page. Instead, verify that you can see the http://server/django/mst3k/admin, which should look like the images above.