Connecting to the Private Ethereum Blockchain
Go up to the CCC HW page (md) | view tabbed version
Overview
We will shortly be developing applications for the Ethereum blockchain. We won’t be using the actual Ethereum blockchain for a number of reasons (cost, legal issues, speed, etc.). Instead, we are going to use a private Ethereum blockchain – a test network – that has been set up for this class. This assignment is to connect to it, explore it, and perform a few operations.
This document assumes that you have a recent version of Python 3 installed, and that you can install Python packages through pip (or pip3). Don’t worry if you don’t know Python – we give you the exact code to use. This document also assumes you can install applications on your machine.
As you proceed through this assignment, you will be filling in values into the ethprivate.py (src) file, which is the only file you will submit at the end.
Changelog
Any changes to this page will be put here for easy reference. Typo fixes and minor clarifications are not listed here. So far there aren’t any significant changes to report.
Part 1: Installation
Geth is the program we will be using to connect to the blockchain. Geth, which stands for Go Ethereum (an Ethereum client written in the Go programming language), is a command-line interface to run an Ethereum node.
You will need to install geth (aka go-ethereum). HOWEVER we need to use an older version of geth – one that allows PoA (proof of authority) and does not require a beacon chain – the last version that supported this was geth 1.13.15. Using a more recent version of geth would not add any more functionality, but it would add a lot more complication.
The geth downloads page no longer lists the links to the older versions, but this archive.org page does. Those links are reproduced below. The three most common ones are also in Canvas’ Files.
- Windows: geth 1.13.15 64-bit (other versions: 32-bit, 32-bit, library only, 64-bit, library only)
- MAC OS X Apple silicon version (other versions: AMD 64-bit)
- Linux: geth-1.13.15 64-bit (other versions: 32-bit, ARMv5, ARMv6, ARM64, ARMv7)
The instructions differ depending on your OS – some OS’es you have to run the installer executable, others you have to unzip (or un-tar) the downloaded package. If prompted (only on some OS’es), you don’t need to install the development tools.
WARNING: After installation, DO NOT JUST RUN geth! Doing so will connect to the default Ethereum network, and will proceed to download the ENTIRE Ethereum blockchain, which is around 500 Gb for a “light” node and almost 2 Tb for a “full” node. It also takes a full week (at least) to synchronize all that data.
Part 2: Blockchain
Here we will connect to our private blockchain.
Step 1: Create a directory to hold the blockchain info – this can be anywhere you want, but we’ll call it /path/to/ethprivate herein.
Step 2: In that data directory, copy the course genesis.json file, which can be found in the Canvas Files section, and is linked to off of the Canvas assignment page. You cannot modify this file – if you do, the genesis block will be different, which will cause the hash to be different, and then your local geth instance will not sync with the course blockchain.
Step 3: Initialize geth with the following command, but change the path (twice) in that command before you run it:
geth --datadir /path/to/ethprivate/ init /path/to/ethprivate/genesis.jsonIf you are in the geth data directory that you created above, and the genesis.json file is also in that directory, then you can run the command as follows:
geth --datadir . init genesis.jsonYou should see about a dozen lines of output, and the last one should be something like the following:
INFO [07-26|09:11:07.145] Successfully wrote genesis state database=lightchaindata hash=XXXXXX..XXXXXXThere are two things to check to ensure that this worked correctly:
- It should say “Successfully wrote genesis state (on the last line)”
- The genesis block hash, shown above as
XXXXXX..XXXXXX, should exactly match what is listed on the Canvas assignment page; it will have an ellipsis (the “..”) in the middle of it
Step 4: Copy the geth-config-???.toml file, in Canvas’ Files, onto your computer (it will have a semester/year suffix to it); save it as geth-config.toml. You can copy it anywhere, but we recommend putting it into the geth directory you created above. You need to change two values in that file (search for “CHANGE ME”):
- The
UserIdent = "mst3k"line should be changed to your UVA userid - The
DataDir = "/path/to/ethprivate"line needs to change to the data directory you created above. - There is one other value, but that is modified in the next assignment
Don’t change anything else! In the next assignment you may need to change the HTTPCors value, but not in this assignment.
Step 5: Start geth. Run the following command to start a geth node. You will use this exact same command for the entire semester, whenever you need to start a new geth node.
geth --config geth-config-???.tomlYou may have to add one more command-line parameter to that command, described at the end of part 3 (Geth).
There is lots of output when it is running, and we will verify that it has connected properly in a moment.
This is running the node, and we are going to run geth (again) in a moment to connect to that node.
Part 3: Geth
What is running from the previous part is the Ethereum node, but that is not interactive. You must leave it running while you perform the next few parts of this assignment.
Attach to the geth node
To enter commands via the keyboard, you have to “attach” to the local Ethereum node. You do this by entering the following command:
geth attach /path/to/ethprivate/geth.ipcIf you are in the same directory as geth.ipc, you may have to enter ./geth.ipc as the file name. Note that this won’t work unless the geth node, from the previous step, is running. You will then get a prompt, which is just a greater-than sign. This is a JavaScript console.
If you have this installed on Windows, when you start the geth node (from the previous step), you will see output like this – the text circled in red is the file name for the geth.ipc file (putting geth attach before it). It will likely be one of the following:
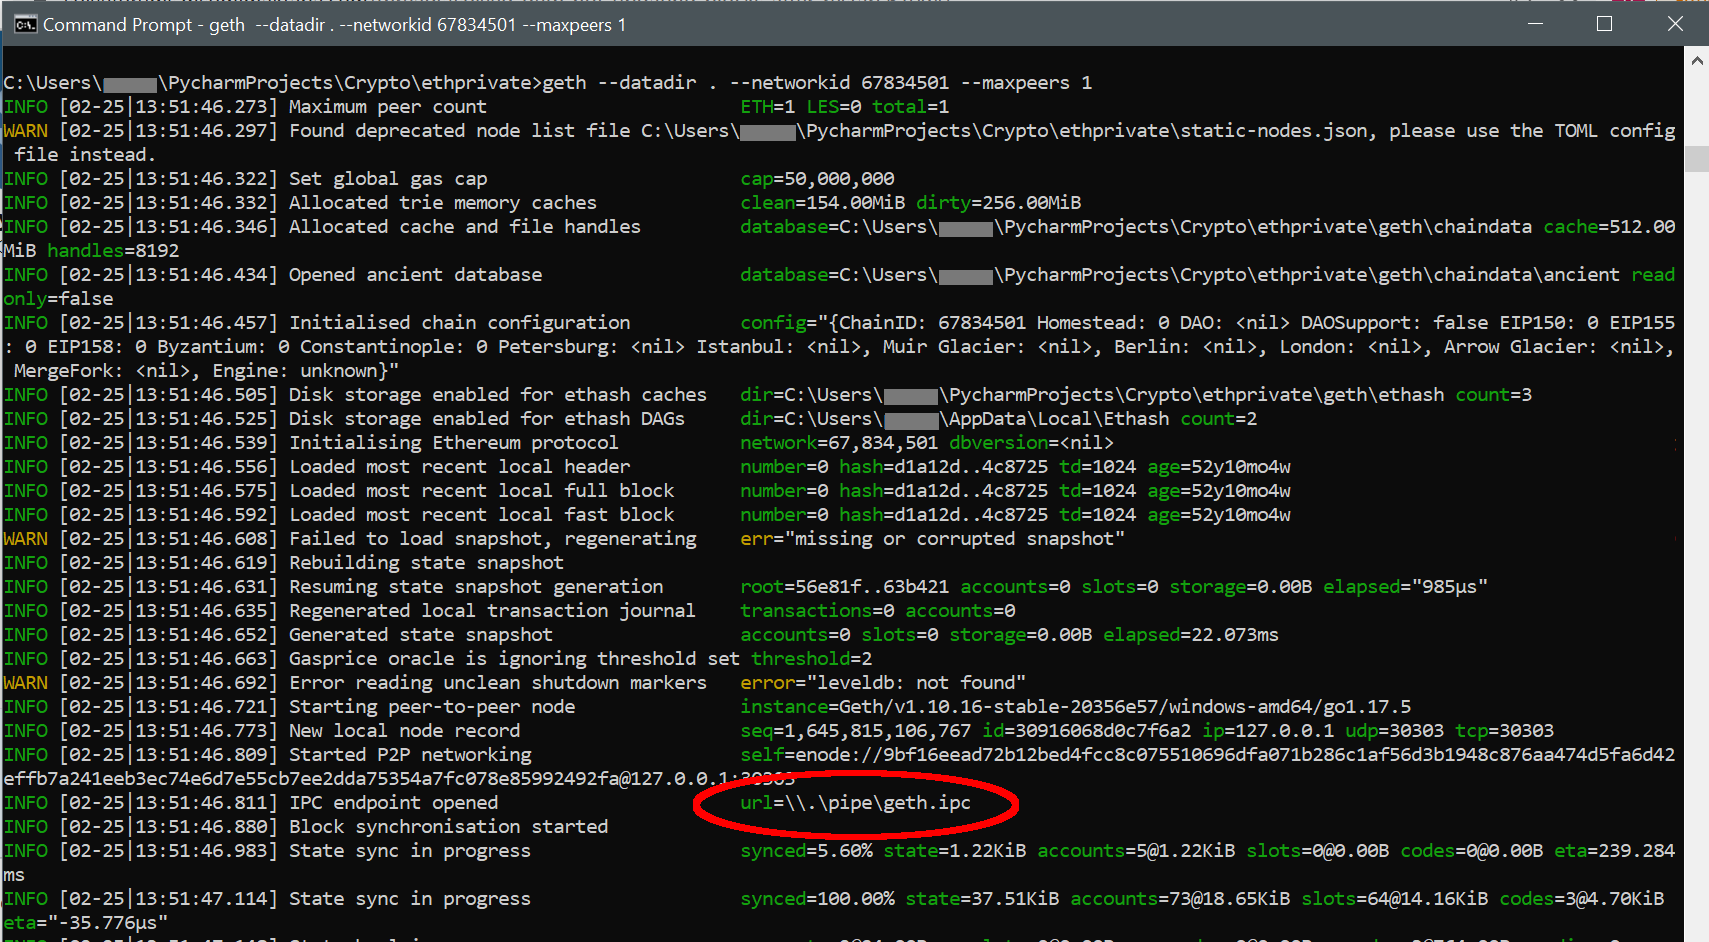
geth attach \\.\pipe\geth.ipc
geth attach ipc:\\.\pipe\geth.ipc
geth attach ipc:\\\\.\\pipe\\geth.ipc
That last line rendered correctly – it has three sets of backslahses – 4, then 2, then 2. And run it from the directory that your geth.ipc file is in. As before, note that this won’t work unless the geth node, from the previous step, is running.
In either case, you will then get a prompt, which is just a greater-than sign. This is a JavaScript console. It should look something like this:
Welcome to the Geth JavaScript console!

instance: Geth/andromeda/v1.13.1-stable-3f40e65c/linux-amd64/go1.21.1
at block: 0 (Fri Sep 16 2022 12:52:06 GMT+0000 (UTC))
 datadir: /path/to/ethprivate
 modules: admin:1.0 clique:1.0 debug:1.0 engine:1.0 eth:1.0 miner:1.0 net:1.0 personal:1.0 rpc:1.0 txpool:1.0 web3:1.0

To exit, press ctrl-d or type exit
>
Interacting with geth
First, let’s wait for it to sync. Since you have saved the geth-config.toml file, it should connect to the course server and start downloading all the blocks in the blockchain. This may take some time, but hopefully less than 5 minutes.
As it is syncing, you can try these commands:
admin.peers.lengthwill tell you how many peers you are connected to – it should be 1. One of the options in the geth-config.toml file prevents it from connecting to additional peers, as additional peers are not needed in the course setup. If you enter this right after you start up geth, it may return 0, as it is still connecting to the peer(s).- Important: if this ever evaluates to 0, then you are not connected to the course blockchain, and your node is not syncing.
admin.peerswill print information on each of those peers. Once established, it should list exactly one peer – the course server, whose ‘enode’ specification is the same as what is in the geth-config.toml file that you downloaded above.eth.blockNumberwill return the highest block number in the blockchain that is on your computer. If it is returning zero, then it is not synced (or is not trying to sync).eth.syncingwill either return ‘false’ if it is not syncing, or a JSON dictionary if it is.- If
eth.blockNumberis 0 andeth.syncingis false, then it is not syncing, perhaps due to a networking connection issue. This will always be the case right after geth starts and before it has had a chance to connect to the peer(s). - If
eth.syncingis false andeth.blockNumberis non-zero, then – most likely – it has completed syncing (it could also be that geth just started, and it hasn’t had a chance to start syncing yet). - If
eth.syncingreturns a JSON dictionary, then it is in the process of syncing.- The
currentBlockvalue, akaeth.syncing.currentBlockis the highest block it has synced so far; this is also the value thateth.blockNumberreturns - The
highestBlockvalue, akaeth.syncing.highestBlock, is what it is working on syncing up to - Once
currentBlockreacheshighestBlock, then the syncing will be complete, andeth.syncingwill returnfalse, as it is no longer syncing.
- The
- You can use this command to print out the syncing status:
console.log ("at " + eth.blockNumber + " of " + eth.syncing.highestBlock + " blocks; " + (eth.syncing.highestBlock-eth.blockNumber) + " blocks left to sync")
- If
Once it is synced, here are some commands for you to try out:
personal.newAccount()will generate an Ethereum account for you.- If you were to do this on the Ethereum Mainnet, you would most definitely have to enter a password. You probably don’t need to have one for this key, since the ether on this blockchain has no monetary value. It will give you an account address back, such as 0x0123456789abcdef0123456789abcdef01234567. Let’s only create one account for now; you can always create more later if you want.
- If this command does not work (often an error such as “ReferenceError: personal is not defined”), then you have to re-launch the geth node with the
--rpc.enabledeprecatedpersonalflag when starting the node (not when attaching); your full geth command to start the node would be:geth --config geth-config.toml --rpc.enabledeprecatedpersonal(changing the config file name as appropriate). This happens on version 1.11.* of geth, which has removed the personal API; versions 1.10.* and lower do not need this flag. You will have to re-run the geth-attach command as well.
- You can get that account number anytime via
eth.coinbase- Some versions of geth will report that
eth.coinbaseis not working. If that is the case, entereth.accounts– if it is not empty (meaning the list has at least 1 account number), you can useeth.accounts[0]in lieu of youreth.coinbase. You will have to do this when you turn in your assignments as well – use theeth.accounts[0]value foreth.coinbasewhen completing the ethprivate.py (src) file. - You can fix this by running
miner.setEtherbase(eth.accounts[0]); this will register youreth.accounts[0]as youreth.coinbase. Apparently this only has to be done once.
- Some versions of geth will report that
- You can check the balance in your account by
eth.getBalance("0x0123456789abcdef0123456789abcdef01234567"), using your account number as the parameter – it should be zero at this point- Or try:
eth.getBalance(eth.coinbase)oreth.getBalance(eth.accounts[0])
- Or try:
Part 4: Get ether
You cannot mine on this blockchain – it has been set up to automatically mine any transaction to the blockchain for you. In order to obtain some funds, you should go to the course Ethereum Faucet, the URL of which is listed on the Canvas assignment page. Each time you use this faucet you will obtain 100 (fake) ETH. USE THIS RESPONSIBLY!!! The intent of the faucet is for you to obtain as much funds as you need for this course. But if you spam that site with unnecessary requests to gain lots of funds, it will cause a slowdown of the system, and a dramatic increase in the blockchain size, which will interfere with your classmates ability to do their work. This will make me cranky. If you request funds a few dozen times throughout the semester, that’s totally fine. Even a hundred requests this semester would be fine. But if you are making the requests thousands of times, that’s going to be a problem.
You should request funds once or twice for this assignment. After you make the requests – you’ll need your full eth.coinbase account address – you should check that your balance was updated in the geth terminal. You can use eth.getBalance(eth.coinbase), but that reports it in wei (which has 18 more zeroes). You can also use web3.fromWei(eth.getBalance(eth.coinbase), "ether") to get the value in ether.
You will determine the transaction hash and the block number for this transaction later in this assignment (in part 8).
To verify that you did this part, we are going to check that you have a non-zero balance in your eth.coinbase account.
Part 5: Extract key
We need to get the private key of the account you created, as we will need that for our dApp development in future assignments. The private key is encrypted in a .json file in the keystore/ sub-directory of your geth data directory. The file will have a name like: UTC–2022-01-08T19-53-08.823103866Z–0123456789abcdef0123456789abcdef01234567. Note that the last part of that name (“0123456789abcdef0123456789abcdef01234567”) matches the Ethereum address we obtained and that is returned from eth.coinbase.
First, ensure that the web3 and hexbytes Python packages are installed – run pip install web3 hexbytes or pip3 install web3 hexbytes.
Run python (or python3, depending on your OS). Note that we are going back to Python for now, and will come back to geth later. In Python, enter the following two lines, changing the values as appropriate to the file name (with full path) and the password for the Ethereum account you created in geth:
password="password"
filename="/path/to/ethprivate/keystore/UTC--2022-01-08T19-53-08.823103866Z--0123456789abcdef0123456789abcdef01234567"
Note the “keystore” sub-directory in that path!
Next, cut-and-paste the following code into your Python terminal.:
from web3.auto import w3
keyfile = open(filename)
encrypted_key = keyfile.read()
private_key = w3.eth.account.decrypt(encrypted_key,password)
import binascii
binascii.b2a_hex(private_key).decode('ascii')
You do not need to know what the above commands do, although you are welcome to look into it. When you run those commands, it will look like the following:
$ python3
Python 3.8.10 (default, Nov 26 2021, 20:14:08)
[GCC 9.3.0] on linux
Type "help", "copyright", "credits" or "license" for more information.
>>> password='password'
>>> filename='/path/to/ethprivate/keystore/UTC--2022-01-08T19-53-08.823103866Z--0123456789abcdef0123456789abcdef01234567'
>>> from web3.auto import w3
>>> keyfile = open(filename)
>>> encrypted_key = keyfile.read()
>>> private_key = w3.eth.account.decrypt(encrypted_key,password)
>>> import binascii
>>> binascii.b2a_hex(private_key).decode('ascii')
'0123456789abcdef0123456789abcdef0123456789abcdef0123456789abcdef'
>>>
$
The decoded private key is the hex line at the end. Save this decoded private key somewhere, as you will need it in future assignments. Normally we would never save this in plaintext, but the (fake) ETH on this system are still worth $0. You are welcome to put it in the ethprivate.py file – just create a new field. Again, since the ether on this blockchain is worth nothing, we can bypass what would otherwise be a security problem by listing our private key in plain text.
Part 6: Send ether
Next you are going to send me some money via the geth command line. We are done with Python for this assignment, and have to go back to the geth prompt (via geth attach /path/to/ethprivate/geth.ipc) for this.
To send (fake) ETH, you have to first unlock your account:
personal.unlockAccount("0x0123456789abcdef0123456789abcdef01234567");This will prompt you for your password. You have to replace the address shown with your account address. You can also use eth.coinbase as the account address, as that should be the same account: personal.unlockAccount(eth.coinbase). By default it unlocks for 5 minutes; you can unlock it until geth exits via: personal.unlockAccount(eth.coinbase, "password", 0) (replacing password with your account’s password).
You can then send me 1 (fake) ETH:
eth.sendTransaction({from:eth.coinbase, to:'0xffffffffffffffffffffffffffffffffffffffff', value:web3.toWei(1,"ether"), gas:21000});You have to replace the ‘to’ field with the address found on the Canvas assignment page. Note that we replaced your account address with eth.coinbase. This will print out a hex string – save it! That’s the hash of the transaction, and we’ll need it shortly. It will be something long like: 0x0123456789abcdef0123456789abcdef0123456789abcdef0123456789abcdef (it’s the 256-bit SHA3 hash of the transaction). This goes into the send_txn_hash field in ethprivate.py.
NOTE: Be sure you cut-and-paste the destination account properly! It’s easy to mis-type the account, and send the ether to the wrong place where it can never be accessed again. And it’s easy to cut-and-paste that command, which sends the money to the account with all f’s as the address, which will also lose the ether.
Further steps to do in the geth console:
- Check your balance via
eth.getBalance("0x0123456789abcdef0123456789abcdef01234567")– you may notice that the balanace has not changed if you enter that before the transaction was not mined into a block.- You can also get your account balance in (fake) ETH via:
web3.fromWei(eth.getBalance(eth.coinbase), "ether") - It will have taken out a bit more than 1 ETH, as there were gas fees as well (which should have been 0.000021 ETH)
- You can also get your account balance in (fake) ETH via:
- You can see your pending transaction via
eth.pendingTransactions(again, only if you enter that before it is mined into a block). - Get information on the mined transaction:
eth.getTransactionReceipt("0x0123456789abcdef0123456789abcdef0123456789abcdef0123456789abcdef")– replace the hash there with the transaction hash you recorded, above.- Note the block number, which you will have to submit along with the transaction hash
We can verify that you did this part by checking if your eth.coinbase account sent 1 ETH to the specified course account. You will need to submit both the transaction hash and the block number from when you sent 1 ether.
Part 7: Explore geth
You should explore geth on your own. When you start geth (via geth attach geth.ipc), it lists the modules available:
Welcome to the Geth JavaScript console!

instance: Geth/asb2t/v1.10.25-stable-69568c55/linux-amd64/go1.18.5
at block: 0 (Fri Sep 16 2022 12:52:06 GMT+0000 (UTC))
 datadir: /path/to/ethprivate
 modules: admin:1.0 clique:1.0 debug:1.0 engine:1.0 eth:1.0 miner:1.0 net:1.0 personal:1.0 rpc:1.0 txpool:1.0 web3:1.0

To exit, press ctrl-d or type exit
>
Your geth version number may be more recent. The modules are listed on the 7th line (admin, clique, debug, eth, miner, net, personal, rpc, txpool, and web3). In the console, type the start of the module, a period, and hit the Tab key – it will show you all the possible completions. If you type in the name and it’s a function, it will tell you that. And if you try to run the function with no parameters, and it needs parameters, it will tell you that as well. Lastly, it’s a JavaScript console, so you can use any JavaScript programming, if you happen to know JavaScript. (You won’t need to know much JavaScript for this course). If you do know Javascript, note that this is a much older version of Javascript, before any of the async functionality was added (if you don’t know Javascript, you can ignore this sentence).
There isn’t much you can break here – worst case you lose your (fake) ether, and then you can just request more for the faucet. This course blockchain is for you to use and learn from, so feel free to play around if you would like.
Part 8: Explorer
We have a web-based blockchain explorer for our private Ethereum blockchain. The link to that is on the Canvas assignment page. Browse that site, and play around with the search functionality. Directions for how to use it are on the main page. Note that the site updates every minute, so if you make a transaction, it will not be immediately visible there – the time of the last update is listed on the main page (the second to last bullet under ‘Statistics’).
Find the web page that contains the transaction (not the block!) where you send me the 1 (fake) ETH; you will need to submit this URL. You should also see the block number listed there as well. These go into the send_txn_url and send_txn_block_number fields in ethprivate.py.
For the transaction where you received funds from the faucet, from part 4 of this assignment, you will need to determine the transaction hash, block number, and URL in the explorer. You can look for your specific eth.coinbase account address – either on the page of all addresses, or use the search box in the upper right. The very first transaction (which will be on the bottom of the list) is likely the faucet transaction. Copy the transaction hash (not the ‘from’ or ‘to’), and note the block number. You can copy the transaction hash by clicking on the copy icon ( ) in the explorer. Also click on that transaction to get the URL in the explorer. These three will have to entered into the respective fields in the
 other dictionary (faucet_txn_block_number, faucet_txn_hash, faucet_txn_url).
Closing down
If you are not actively using it, you should shut your geth node down. UVA ITS has given permission to do all this, but they do perform port scans on all machines, so no need to raise their hackles by keeping a geth node up and running when we aren’t using it. You can easily re-launch it when you need it again for a future assignment. Likewise for the console from part (3); if you close down the geth node, the console won’t work.
Submission
You will need to fill in the various values from this assignment into the ethprivate.py (src) file. That file clearly indicates all the values that need to be filled in. That file is the only file that must be submitted for this assignment; future assignments will have additional Solidity source code submitted as well. The sanity_checks dictionary is intended to be a checklist to ensure that you perform the various other aspects to ensure this assignment is fully submitted.
There are two forms of submission for this assignment; you must do both.
Submission 1: You will need to send 1 (fake) ether to the course-wide address indicated on the Canvas assignment page; this was done in part 6, above. This implies that you received ether from the faucet so that you can send that required 1 ether.
Submission 2: Submit your completed ethprivate.py file, and ONLY that file, to Gradescope.
Because this is a tutorial, rather than a homework assignment, your grade is shown when you submit. If you receive a grade less than 10, it will tell you the errors, and you should fix them and resubmit.