PDR: Laboratory 2: Linked Lists
Go up to the Labs table of contents page
Objective
This laboratory introduces you to some advanced class development in C++, creating and using iterators, manipulating pointers, and linked data structures. It also addresses some issues involving testing and software development.
Background
The linked list is a basic data structure from which one can implement stacks, queues, sets, and many other data structures. Lists may be singly- or doubly-linked. In this lab we will implement a doubly-linked list.
Tutorial
In this lab, you will have to make a choice as to which debugger to use; this will affect which tutorial you carry out. You can choose the LLDB debugger (you would then complete Tutorial 2: LLDB) or the GDB debugger (you would then complete Tutorial 2: GDB). The source code provided for each tutorial is exactly the same, and the deliverable (i.e., what you turn in) is likewise the exact same.
The LLDB debugger is preferred as it was built with the
clang++ compiler that we are using; however, the GDB
tutorial is offered if LLDB doesn’t work for you.
Just remember which one you choose, as you will end up using that debugger throughout this course. And if you ever have to switch between them, you can use our GDB vs LLDB page to see the (relatively few) commands that are different between the two.
Ultimately, this is a low stress choice. Choose LLDB, and only switch over to GDB if you run into issues.
Recommended Readings
- Pointers and Linked Lists sections on the Readings page
- The Debugging FAQ from UMich
Procedure
Pre-lab
- Finish the subset of methods that allow you to use the test harness (see requirements in detailed write-up below).
- Files to download: List.h (src), ListNode.h (src), ListItr.h (src), ListTest.cpp (src)
- Files to submit: ListNode.h/cpp, ListItr.h/cpp, List.h/cpp, ListTest.cpp
In-lab
- Use the debugger to find and correct the errors in debug.cpp in part II of the debugger tutorial
- Continue to work on your List and debug any issues with the debugger as necessary
- Files to download: prog1.cpp (src), debug.cpp (src)
- Files to submit: debug.cpp
Post-lab
- Make sure your development environment is set up to be able to test for memory leaks, as described in the post-lab section
- Finish the implementation of your List and ensure it is free of any memory errors
- Files to download: no additional files beyond the pre-lab and in-lab
- Files to submit: ListNode.h/cpp, ListItr.h/cpp, List.h/cpp, ListTest.cpp
Pre-lab
Code Description
Linked lists are described in the online Readings.
You will be implementing a doubly linked list, and you will be using “dummy” nodes as well. You will want two dummy nodes – one for the head and one for the tail. A benefit of doing your implementation using dummy nodes is that there are fewer special cases to check for – for example you never have to update the head pointer on an insertBefore() or a remove() – the head pointer always points to the dummy header node. A dummy tail pointer would help out in the same respect. The downside is that you use two extra “empty” nodes.
For this lab you will need to implement three classes:
- ListNode
- List
- ListItr
For the pre-lab however, you are only required to implement a subset of the required methods. For your pre-lab to get full credit, the following methods must be working:
- All of ListNode (so…the constructor)
- List constructor
List::insertAtTail- All of ListItr
List::firstList::sizeprintList(forward, not backward)
For simplicity we will just create a list that holds integers (your code could easily later be templated (i.e. made generic) to allow it to contain objects of other types). You must not modify any of the provided declarations in the header files, though you may add onto the header files as you see fit.
UML Diagram
Below is a UML diagram showing how these classes interact with each other.
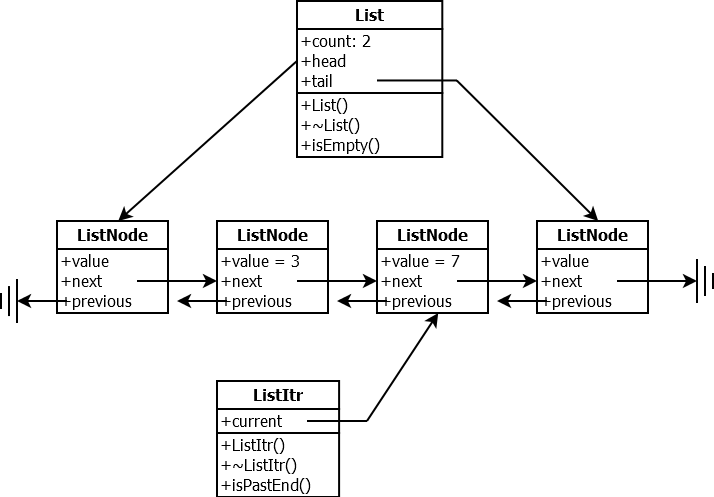
This diagram shows a list containing two elements, the integers 3 and 7. Note that there are more methods in the List and ListItr classes than what is shown above. The head and tail pointers in the List class point to dummy nodes – they are put there to make inserting elements into the list easier. It doesn’t matter what the value of the dummy nodes is set to, as it won’t be used. Each ListNode points to the nodes before and after it (although the dummy nodes each have one pointer pointing to NULL).
Thus, our doubly linked list will have only one List object and many ListNode objects (2 more than the number of elements in the list). A ListItr is a separate object, which points to one element in the list (possibly a dummy node). As you call the various methods in ListItr to move the iterator forward and backward, the node that it points to will change.
ListNode
A ListNode contains an integer value, as well as next and previous pointers to other ListNodes. View the ListNode.h (src) code for details.
List
This class represents the list data structure containing ListNodes. It has a pointer to the first (head) and last (tail) ListNodes of the list, as well as a count of the number of ListNodes in the List. View the List.h (src) code for details.
ListItr
A ListItr maintains a pointer to a current position in a List to allow for easy traversal through the List. View the ListItr.h (src) code for details.
Test Harness
We have provided a test harness for testing your whole implementation: ListTest.cpp (src) Your List must work with this test harness.
Hints
There are a few things that always cause students some headache. We’ve tried to explain some of them here, in an effort to lessen the frustration it causes.
Getting started
To start, create all three .cpp files (List.cpp, ListNode.cpp,
ListItr.cpp) and include the relevant .h files. Fill the files with
empty method bodies (with a dummy return value for non-void
methods) and get that to compile. Then start implementing one method
at a time, testing as you go.
Here are the functions you need to have implemented for this pre-lab, which will allow you to start using the ListTest harness (listed in suggested implementation order):
- All of ListNode (so…the constructor)
- List constructor
List::insertAtTail- All of ListItr
List::firstList::sizeprintList(forward, not backward)
Segmentation faults
When beginning to test your code, chances are your program will crash
unexpectedly with a message similar to
Segmentation fault (core dumped), commonly referred to as a
segfault. Get prepared to see these often throughout the
course, as unlike other programming languages like Java, C++ does not
give any extra debugging information on a crash. In order to determine
where and why your program is crashing, run your code through the
debugger and look at the backtrace. Segfaults generally indicate that
you are trying to dereference a NULL or invalid pointer, so those are
good things to look out for.
The constructor
By the time the constructor finishes, we should have a functioning
(but empty) list. This means that head and
tail need to be set appropriately! What should they point
to if the list is empty?
Make sure you are initializing the variables that are specified in the .h file and not declaring new variables that have the same name as those in the header file. Take a look back at lifecycle.cpp’s constructors from Lab 1 if you need a refresher.
The copy constructor and the copy assignment operator
The code for the copy constructor and the operator=()
method in the List class are shown below. Although we are providing you
with this code, you must understand how it works by the end of the lab,
as you will have to implement these types of methods on future labs and
exams. It also might help you with some of the other methods! (Hint
hint.)
// Copy constructor
// Called when the code looks something like List list2 = list1;
// (In other words, it is called when you are trying to construct a **new** list from an existing one)
List::List(const List& source) {
    head=new ListNode();
    tail=new ListNode();
    head->next=tail;
    tail->previous=head;
    count=0;

    // Make a deep copy of the list
    ListItr iter(source.head->next);
    while (!iter.isPastEnd()) {
        insertAtTail(iter.retrieve());
        iter.moveForward();
    }
}

// Copy assignment operator
// Called when the code looks something like list2 = list1;
// (In other words, it is called when you are trying to set an **existing** list equal to another one)
List& List::operator=(const List& source) {
    if (this == &source) {
        // The two are the same list; no need to do anything
        return *this;
    } else {
        // Clear out anything this list contained
        // before copying over the items from the other list
        makeEmpty();

        // Make a deep copy of the list
        ListItr iter(source.head->next);
        while (!iter.isPastEnd()) {
            insertAtTail(iter.retrieve());
            iter.moveForward();
        }
    }
    return *this;
}
Note that these two methods are correctly implemented. However, they depend on the other methods working properly. If you are seeing crashes in these methods, it is likely because some of the other supporting methods are not working properly.
Insert methods
When implementing the three insert functions, we have found it helpful to draw out the pointers on paper and determine the order in which to update the pointers before beginning to code the function itself. Take the time to reason about how many next and previous pointers you should be updating!
For insertAfter and insertBefore, the
ListItr you are given is already pointing to a ListNode. You should
insert the new ListNode after or before that ListNode, respectively. If
you find yourself thinking about loops or iteration, that is
unnecessary! Double-check the ListItr header file.
Find and remove
Since find needs to return a ListItr, it might make
sense to also implement it using iterators, though that is not
required.
As remove takes in an integer rather than a ListItr, we
first need to determine whether or not that integer exists in our
list.
makeEmpty and the destructor
makeEmpty should clear the list of all elements
(isEmpty should return true after calling
makeEmpty). It should also make sure that head
and tail no longer point to those deleted elements (what
should they point to instead in an empty list?).
Since we have been dynamically allocating ListNodes, we must also be
responsible for deleting them to ensure we do not leak memory. There are
multiple ways to iterate through the list and delete each
ListNode – experiment and see what makes the most sense to you.
Important: once you delete a ListNode, you can no
longer reliably access any of its data, such as its next or
previous pointers! To make sure you don’t do this
accidentally, we recommend setting each ListNode to NULL as soon as you
delete it.
The destructor should delete all dynamically-allocated memory, as we no longer need this List instance. Thus, it makes sense that we should delete all the elements we inserted (hint: do we already have a method for that?). However, what else do we dynamically allocate that we need to delete?
printList
This one’s interesting becaus it’s a non-member function, which means it doesn’t have access to any private variables.
As we’ve been using private variables heavily up until this point, try taking a step back and looking at the bigger picture. If you can’t use anything private, that means you’re limited to only public methods.
Is there anything that helps you create a ListItr that points to the first or last node in the List? What about a way to retrieve each node’s value from the iterator?
When printing out the elements of the list, separate them with a space and use a newline after the last element. If the list happens to be empty, just print out a newline. See the sample output section for an example of the formatting.
Compiling
When compiling your code, you must remember to compile all of your .cpp files in one line:
clang++ List.cpp ListItr.cpp ListNode.cpp ListTest.cppThere are ways to compile these programs in pieces, but we will see this later in the semester.
Linker errors are commonly caused by one of two problems:
Undefined symbols for architecture...orUndefined reference to...means that you forgot to implement some functions, or that you forgot to compile all four files together. Here’s an example:
/tmp/ListTest-8ea7aa.o: In function `main':
ListTest.cpp:(.text+0x37c): undefined reference to `List::List()'
ListTest.cpp:(.text+0x116d): undefined reference to `List::insertBefore(int, ListItr)'
ListTest.cpp:(.text+0x1d34): undefined reference to `List::List()'
clang: error: linker command failed with exit code 1 (use -v to see invocation)
Looks like we forgot to implement the List constructor and insertBefore!
Duplicate symbol...orMultiple definition of...means that you have defined the same function more than once. Make sure you’re only including.hfiles and that you haven’t accidentally redefined a function somewhere. Here’s an example:
/tmp/ListItr-6e3849.o: In function `List::insertBefore(int, ListItr)':
ListItr.cpp:(.text+0x120): multiple definition of `List::insertBefore(int, ListItr)'
/tmp/List-2e4fcd.o:List.cpp:(.text+0x5d0): first defined here
clang: error: linker command failed with exit code 1 (use -v to see invocation)
This time, we defined insertBefore twice – once in ListItr, and once in List. The one in ListItr must be a mistake!
Sample Execution Run
In order to make autograding easier, we expect you to follow the
output formats specified in these write-ups. Although the test harness
handles most of the output formatting for you, the
printList() method output must be written by you, and as
was mentioned above, you should print the list elements separated with a
space, following with a newline after the last element. If the list is
empty, only print out a newline. An example run is shown below to
demonstrate how your output should look. This sample output applies to
all sections of this lab.
--------------------------------------------------
    This test harness operates with one List
    object and one ListItr object.

    Use the menu options to manipulate these
    objects.
     - - - - - -  MENU - - - - - -

        1 - Quit
        2 - New List
        3 - Show List elements
        4 - Set ListItr with first()
        5 - Set ListItr with find()
        6 - Set ListItr with last()
        7 - Move ListItr forward
        8 - Move ListItr backward
        9 - Retrieve element at ListItr
        10 - Insert element before
        11 - Insert element after
        12 - Insert element at tail
        13 - Remove element
        14 - Cardinality (size)
        15 - Copy list w/copy constructor
        16 - Copy list with operator=
        17 - Make list empty

     - - - - - - - - - - - - - - -
     Enter number of choice > 2
        You have created an empty list
        Do you want to initialize it with elements? (y/n) > y
            Enter elements one by one as integers.
            Any non-numeric character, e.g. #, will terminate input
    Enter first element: 1
    Enter next element: 2
    Enter next element: q

The elements in forward order:
1 2
     - - - - - -  MENU - - - - - -

        1 - Quit
        2 - New List
        3 - Show List elements
        4 - Set ListItr with first()
        5 - Set ListItr with find()
        6 - Set ListItr with last()
        7 - Move ListItr forward
        8 - Move ListItr backward
        9 - Retrieve element at ListItr
        10 - Insert element before
        11 - Insert element after
        12 - Insert element at tail
        13 - Remove element
        14 - Cardinality (size)
        15 - Copy list w/copy constructor
        16 - Copy list with operator=
        17 - Make list empty

     - - - - - - - - - - - - - - -
     Enter number of choice > 17
The list is (forward): 1 2
The list is (backward): 2 1
The list was made empty (forward):
The list was made empty (backward):
In the example output, you can see that the list elements are printed
out separated by a space: 1 2. After the last element (2 in this case),
a newline was printed. Furthermore, when the list was made empty, only a
newline was printed out. Make sure to follow these two formatting
constrains when implementing the printList method,
otherwise Gradescope will not give you any credit.
In-lab
Complete Part II of the tutorial for this lab and submit your debugged version of debug.cpp; we are not submitting prog1.cpp. Remember the standard identifying header information.
Going forward, if you have a post-compilation problem with your program (crash, etc.), the TAs will not help you until you have run it through the debugger and learned all that can be learned from this. So make sure you understand the tutorial!
Verify to yourself that your methods are working properly with your linked list code using the debugger that you just learned about. If you have not yet completed your linked list implementation, use the debugger to help you identify the issues/problems with parts of your current implementation. Consult with a TA if you have questions.
Post-lab
For the post-lab, your goal is to submit a fully-functional version of your doubly-linked list.
Complete the LinkedList code
Finish any methods that you haven’t completed yet, and then move on to checking for memory errors.
Memory Leaks and Corruption
Even though your code might appear to work correctly, it might still be leaking or corrupting memory!
- A memory leak occurs when you forget to deallocate some memory that you dynamically allocated earlier, which causes your program to hold onto that memory forever until it exits!
- Memory corruption occurs when your code attempts to access some memory address that it does not have access to, for example, attempting to read or write to a previously-deleted pointer. C++ will blindly dereference a pointer without checking its validity. Clearly, this can cause your program to do unexpected things!
These types of errors can cause your host machine to run out of memory and crash, or edit some other file that your program shouldn’t have access to! We will be checking that your code does not contain any memory errors because of their potential severity.
If you are using Mac OS X (and ONLY if you are using Mac OS X), then you will need to run the following commands (the Linux VirtualBox image is all set up to do this properly):
/usr/bin/ruby -e "$(curl -fsSL https://raw.githubusercontent.com/Homebrew/install/master/install)"
brew install llvm
PROFILE_FILE=$(if [[ -n $ZSH_VERSION ]]; then echo ~/.zshrc; else echo ~/.bash_profile; fi)
echo 'ASAN_OPTIONS=detect_leaks=1\nexport PATH="/usr/local/opt/llvm/bin:${PATH}"' >> $PROFILE_FILE
source $PROFILE_FILE
Now you can compile your code with AddressSanitizer enabled:
clang++ List.cpp ListItr.cpp ListNode.cpp ListTest.cpp -fsanitize=address -fno-omit-frame-pointer -gThe flags are the following:
-fsanitize=addressturns on AddressSanitizer, which ensures that your code never attempts to reference deleted memory or memory that you do not have access to (i.e., it checks for invalid addresses). It also enables LeakSanitizer, which ensures that anything that is dynamically allocated is also deallocated.-fno-omit-frame-pointerhelps us obtain better stack traces, so we include it just in case.- We use the
-gflag from earlier to indicate that we want to include debugging information such as line numbers.
Run the executable with ./a.out as usual, but make sure
you are not running it in the debugger – AddressSanitizer is
incompatible with debuggers.
AddressSanitizer will immediately crash upon any invalid behavior. This is helpful because AddressSanitizer detects when we try to use addresses that we do not control, and thus, we have no idea what will happen when we use them! AddressSanitizer crashes the program because there is no guarantee of what will happen next. If this happens, carefully inspect the stack trace, attempt to fix the error, and recompile.
Here’s an example of an AddressSanitizer crash:
==28315==ERROR: AddressSanitizer: heap-use-after-free on address 0x6030000003a8 at pc 0x000000519188 bp 0x7ffff83e7910 sp 0x7ffff83e7908
READ of size 8 at 0x6030000003a8 thread T0
    #0 0x519187 in List::makeEmpty() /home/winston/github/computer-science/cs2150/labs/lab-2/postlab/List.cpp:68:20
    #1 0x51db77 in main /home/winston/github/computer-science/cs2150/labs/lab-2/postlab/ListTest.cpp:446:23
    #2 0x7f07bba91b96 in __libc_start_main /build/glibc-OTsEL5/glibc-2.27/csu/../csu/libc-start.c:310
    #3 0x41bbe9 in _start (/mnt/c/Users/Winston/Documents/GitHub/computer-science/cs2150/labs/lab-2/postlab/a.out+0x41bbe9)

0x6030000003a8 is located 8 bytes inside of 24-byte region [0x6030000003a0,0x6030000003b8) freed by thread T0 here:
    #0 0x514dc8 in operator delete(void*) (/mnt/c/Users/Winston/Documents/GitHub/computer-science/cs2150/labs/lab-2/postlab/a.out+0x514dc8)
    #1 0x51915e in List::makeEmpty() /home/winston/github/computer-science/cs2150/labs/lab-2/postlab/List.cpp:67:3
    #2 0x51db77 in main /home/winston/github/computer-science/cs2150/labs/lab-2/postlab/ListTest.cpp:446:23
    #3 0x7f07bba91b96 in __libc_start_main /build/glibc-OTsEL5/glibc-2.27/csu/../csu/libc-start.c:310

previously allocated by thread T0 here:
    #0 0x514050 in operator new(unsigned long) (/mnt/c/Users/Winston/Documents/GitHub/computer-science/cs2150/labs/lab-2/postlab/a.out+0x514050)
    #1 0x518bf8 in List::insertAtTail(int) /home/winston/github/computer-science/cs2150/labs/lab-2/postlab/List.cpp:111:22
    #2 0x51bc1d in main /home/winston/github/computer-science/cs2150/labs/lab-2/postlab/ListTest.cpp:121:27
    #3 0x7f07bba91b96 in __libc_start_main /build/glibc-OTsEL5/glibc-2.27/csu/../csu/libc-start.c:310

---snip---
Here, we are trying to use a pointer after it has been deleted.
The first stack trace shows where we try to use it – in this case, in
List::makeEmpty() on line 68, column 20.
The second stack trace shows where we deleted the pointer – right before
we used it, on line 67.
The third stack trace is generally less useful, but shows where we
allocated memory in the first place.
After fixing all of the bugs AddressSanitizer caught, we can move on to LeakSanitizer, which will print out any leaks that it detected when the program exits. If you exit and there is no extra output, congratulations! That means your program is leak-free.
Otherwise, you can look at the stack trace to see what memory you are
leaking. Here is an example of a List implementation that forgets to
delete head and tail in the destructor:
==28454==ERROR: LeakSanitizer: detected memory leaks

Indirect leak of 48 byte(s) in 2 object(s) allocated from:
    #0 0x514050 in operator new(unsigned long) (/mnt/c/Users/Winston/Documents/GitHub/computer-science/cs2150/labs/lab-2/postlab/a.out+0x514050)
    #1 0x5184b5 in List::List() /home/winston/github/computer-science/cs2150/labs/lab-2/postlab/List.cpp:11:15
    #2 0x51b777 in main /home/winston/github/computer-science/cs2150/labs/lab-2/postlab/ListTest.cpp:102:28
    #3 0x7f7c97c91b96 in __libc_start_main /build/glibc-OTsEL5/glibc-2.27/csu/../csu/libc-start.c:310

Indirect leak of 48 byte(s) in 2 object(s) allocated from:
    #0 0x514050 in operator new(unsigned long) (/mnt/c/Users/Winston/Documents/GitHub/computer-science/cs2150/labs/lab-2/postlab/a.out+0x514050)
    #1 0x518465 in List::List() /home/winston/github/computer-science/cs2150/labs/lab-2/postlab/List.cpp:10:15
    #2 0x51b777 in main /home/winston/github/computer-science/cs2150/labs/lab-2/postlab/ListTest.cpp:102:28
    #3 0x7f7c97c91b96 in __libc_start_main /build/glibc-OTsEL5/glibc-2.27/csu/../csu/libc-start.c:310

SUMMARY: AddressSanitizer: 96 byte(s) leaked in 4 allocation(s).
LeakSanitizer will print out where the leaking memory was allocated
so that you can figure out what you forgot to delete. In this case, we
can see we forgot to delete the objects we created on lines 11 and 10 in
the constructor, which just happen to be tail and
head, respectively. Now that we know what we are
leaking, we can start to think about where in our program we
should delete those objects.
Having a program run successfully under AddressSanitizer and LeakSanitizer adds strong assurances towards code correctness!